
I/O | Filters | Basic Unix Tools | Compression & Archiving |Regular Expression | VI editor


Table of contents
- I/O Redirection
- Advanced Script:-
- No Clobber Option
- /dev/null file
- Filters
- Basic Unix Tools
- date & timedatectl Command
- cal Command:
- sleep Command:
- Compression & Archiving
- Gzip: The Classic Compression Tool
- Zcat: Viewing Compressed Files
- Bzip2: High Compression Ratio
- Bzcat: Viewing bzip2-Compressed Files
- Bunzip: Decompressing bzip2 Files
- Tar
- Find
- Find Hidden Files
- Find Empty Files
- i. Find Files Modified Within the Last 30 Days
- ii. Find Files Modified in the Last 15 Minutes
- iii. Find Files Larger Than 1 GB
- iv. Find Files Smaller Than 100 Kilobytes
- v. Find Files Modified More Recently Than a Reference File
- vi. Find Files Modified Older Than a Reference File
- Locate
- Example 8: Locate Binary Executables
- Regular Expression
- VI editor
- Installing Vim Editor in RHEL:
- Vi and Vim Modes:
- 1. Command Mode:
- 2. Insert Mode:
- 3. Delete Mode:
- 4. Saving and Exiting:
- 5.Undo and Redo:
- 6. Replace Character:
- 7. Cut, Copy, and Paste:
- 8.Cut and Paste a Range of Lines:
- 9.Line Manipulation:
- 10. Navigation and Word Movement:
- 11.Search:
- 12.Paste from Other Files:
- 13.Working with Text Buffers:
- Editing Multiple Files:
- Next File:
- Enable/Disable Line Numbers:
I/O Redirection

I/O redirection in Linux refers to the process of changing the input or output of a command or program. In Unix-like/Linux operating systems, I/O redirection is commonly used in the command line to manage input from and output to files or other processes. The three standard file descriptors involved are
stdin (0)
stdout (1)
and stderr (2)
stdin (0):
Standard input is where a program reads its input data.
Syntax:
command < input.txtreads input from the fileinput.txtinstead of the keyboard.Options:
\> Count the Number of Lines with '<'
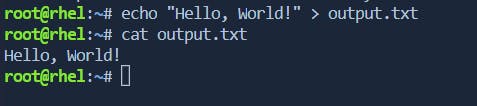
stdout (1):
Standard output is where a program writes its normal output.
Syntax:
command > output.txtredirects the output to the fileoutput.txt.Options:
\> Redirect stdout[>] to a File:
\> Redirect stdout to Append[>>] to a File:

\> Pipe stdout to Another Command:

stderr (2):
Standard error is where a program writes its error messages.
Syntax:
command 2> error.txtredirects error messages to the fileerror.txt.Options:
\> Redirect stderr[2] to a file:
the error message produced by the
lscommand is redirected from stderr to the fileerror.txt.
\> Redirect both stdout and stderr to different files:
command_with_error_and_output 1> output.txt 2> error.txt
ls /path/to/nonexistent/directory: This command attempts to list the contents of a directory that doesn't exist, generating an error.1> output.txt: Redirects the standard output (stdout) of the command to the fileoutput.txt.2> error.txt: Redirects the standard error (stderr) of the command to the fileerror.txt.
After executing this command, the contents of
output.txtwill be empty (since there is no successful output), anderror.txtwill contain the error message produced by thelscommand due to the nonexistent directory.\> Redirect stderr to the same file as stdout:
command_with_error_and_output > output_and_error.txt 2>&1
the
lscommand is used to list the contents of a directory that doesn't exist (/path/to/nonexistent/directory). The error message generated by the command is redirected to the same file (output_and_error.txt) along with any regular output.\> Append stderr to a file:
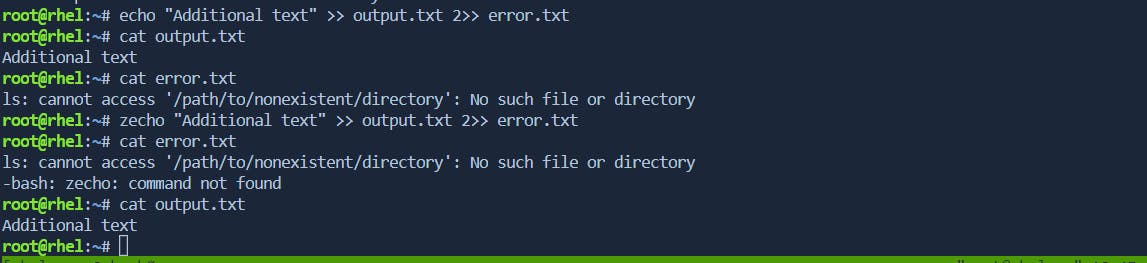
the
echocommand is used to append the text "Additional text" to the fileoutput.txt. The2>>syntax is used to append any error messages (stderr) to the fileerror.txt. If theechocommand encounters an error (for instance, if theechocommand is not found), the error message will be appended to theerror.txtfile.
Advanced Script:-
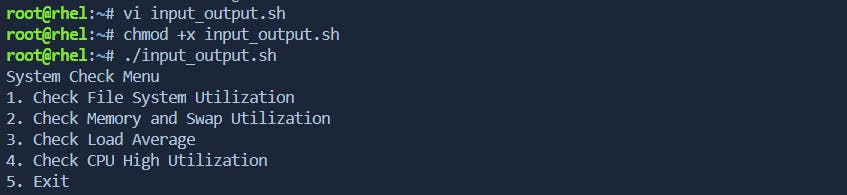
System Health Monitor script . The script will provide options to check file system utilization, net memory[RAM] and swap utilization, load average, and CPU high utilization. The output for each option will be redirected to a log file for monitoring
#!/bin/bash
LOG_FILE="system_check.log"
function check_filesystem_utilization() {
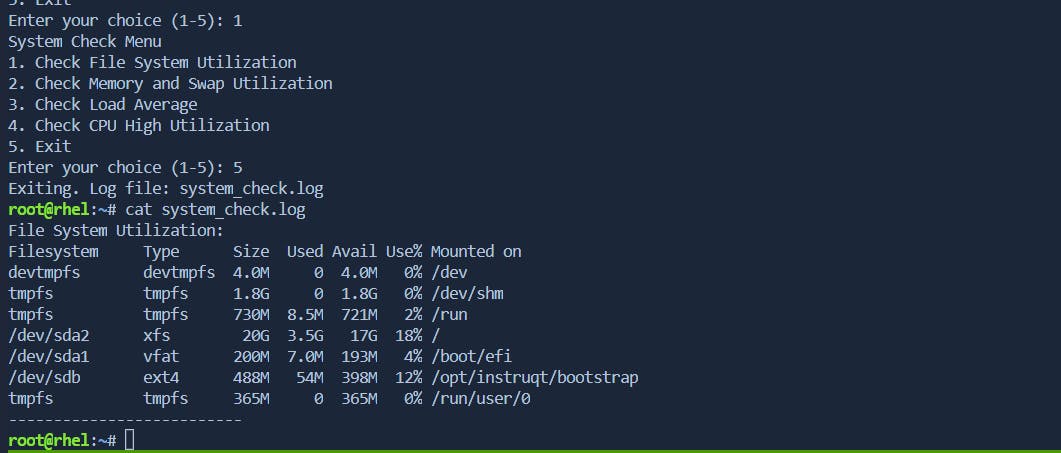
echo "File System Utilization:" >> "$LOG_FILE"
df -hTP >> "$LOG_FILE"
echo "--------------------------" >> "$LOG_FILE"
}
function check_memory_swap_utilization() {
echo "Memory and Swap Utilization:" >> "$LOG_FILE"
free -h >> "$LOG_FILE"
echo "--------------------------" >> "$LOG_FILE"
}
function check_load_average() {
echo "Load Average:" >> "$LOG_FILE"
w >> "$LOG_FILE"
echo "--------------------------" >> "$LOG_FILE"
}
function check_cpu_utilization() {
echo "CPU High Utilization:" >> "$LOG_FILE"
top -b -n 1 | head -n 20 >> "$LOG_FILE"
echo "--------------------------" >> "$LOG_FILE"
}
while true; do
echo "System Check Menu"
echo "1. Check File System Utilization"
echo "2. Check Memory and Swap Utilization"
echo "3. Check Load Average"
echo "4. Check CPU High Utilization"
echo "5. Exit"
read -p "Enter your choice (1-5): " choice
case $choice in
1) check_filesystem_utilization ;;
2) check_memory_swap_utilization ;;
3) check_load_average ;;
4) check_cpu_utilization ;;
5) echo "Exiting. Log file: $LOG_FILE"; exit ;;
*) echo "Invalid choice. Please enter a number between 1 and 5." ;;
esac
done
Explanation:-
#!/bin/bash
#!/bin/bash: This is called a shebang. It tells the system that this script should be interpreted using the Bash shell (/bin/bash).LOG_FILE="system_check.log"
LOG_FILE="system_check.log": This line declares a variable namedLOG_FILEand assigns the value"system_check.log"to it. This variable is used to store the name of the log file where the system check information will be saved.function check_filesystem_utilization() { echo "File System Utilization:" >> "$LOG_FILE" df -hTP >> "$LOG_FILE" echo "--------------------------" >> "$LOG_FILE" }
function check_filesystem_utilization() { ... }: This defines a function namedcheck_filesystem_utilization. Functions are reusable blocks of code that can be called by name.
echo "File System Utilization:" >> "$LOG_FILE": This line prints the text "File System Utilization:" and appends it to the log file specified by theLOG_FILEvariable.
df -hTP >> "$LOG_FILE": This line executes thedfcommand with options-hTP, which displays information about file system utilization in a human-readable format. The output is then appended to the log file.
echo "--------------------------" >> "$LOG_FILE": This line adds a separator line to the log file for better readability.while true; do
while true; do ... done: This is a infinite loop (while true) that will repeatedly execute the code inside the loop.echo "System Check Menu" echo "1. Check File System Utilization" echo "2. Check Memory and Swap Utilization" echo "3. Check Load Average" echo "4. Check CPU High Utilization" echo "5. Exit" read -p "Enter your choice (1-5): " choice
echo ...: These lines print the menu options to the screen.
read -p "Enter your choice (1-5): " choice: This line prompts the user to enter a choice and stores the input in the variablechoice.case $choice in 1) check_filesystem_utilization ;; 2) check_memory_swap_utilization ;; 3) check_load_average ;; 4) check_cpu_utilization ;; 5) echo "Exiting. Log file: $LOG_FILE"; exit ;; *) echo "Invalid choice. Please enter a number between 1 and 5." ;; esac done
case $choice in ... esac: This is a case statement that checks the value of thechoicevariable.
1) check_filesystem_utilization ;;: If the user enters1, it calls thecheck_filesystem_utilizationfunction.
2) check_memory_swap_utilization ;;: If the user enters2, it calls thecheck_memory_swap_utilizationfunction.
3) check_load_average ;;: If the user enters3, it calls thecheck_load_averagefunction.
4) check_cpu_utilization ;;: If the user enters4, it calls thecheck_cpu_utilizationfunction.
5) echo "Exiting. Log file: $LOG_FILE"; exit ;;: If the user enters5, it prints a message, specifies the log file, and exits the script.
*) echo "Invalid choice. Please enter a number between 1 and 5." ;;: If the user enters anything other than 1 to 5, it prints an error message.The script continues to loop, allowing the user to make multiple choices until they choose option 5 to exit the script. The output of each system check function is appended to the log file for later review.
No Clobber Option
the "noclobber" option is a shell feature that prevents the accidental overwrite of existing files when using redirection. When the "noclobber" option is set, using the > and >> operators in the shell will not overwrite existing files by default.
To enable the "noclobber" option, you can use the set -o command in the shell:
set -o noclobber

Here are a couple of examples to illustrate the "noclobber" option:
Preventing Overwrite with
>Operator:$ echo "New content" > existing_file # This will fail if 'noclobber' is setIf
noclobberis set, attempting to use>to overwrite an existing file will result in an error.
Appending to a File with
>>Operator:$ echo "Additional content" >> existing_file # This will append content to the fileThe
>>operator is allowed undernoclobber, as it appends content to the file without overwriting it.
To override the "noclobber" option temporarily for a single command, you can use the >| operator:
$ echo "Force overwrite" >| existing_file # This will overwrite the file regardless of 'noclobber'
This forces the overwrite of the file even when noclobber is set.

Remember to use the "noclobber" option carefully to avoid unintentional data loss, especially when dealing with important files.
To disable the "noclobber" option, you can use the set +o command in the shell:
set +o noclobber

/dev/null file
/dev/null is a special file that serves as a null device, essentially discarding any data written to it and providing an empty stream when read. It is often used to eliminate unwanted output or to send data into oblivion.
Discarding Output:
Writing to
/dev/nullallows you to discard output that you don't need.command_with_lots_of_output > /dev/nullexample:-
while installing package it conations lot of output we don't want to store this so we can redirect to nullify and no output will provided

Silencing Output:
You can redirect both standard output (stdout) and standard error (stderr) to
/dev/nullto silence a command completely.command_with_error_and_output > /dev/null 2>&1example:-
If we get any error in case we can nullify the both error and stdout

Dummy Input:
Reading from
/dev/nullprovides an empty input stream, which can be useful in certain situations.cat /dev/null > empty_file
Creating Empty Files:
You can use
/dev/nullto create an empty file or truncate an existing file.> empty_file
Redirecting Input:
When a command expects input but you don't have any, you can redirect input from
/dev/null.command_needing_input < /dev/nullexample:-
automatically operation aborted without specifying option
Remember, /dev/null is a convenient tool for managing input and output in a way that is equivalent to sending data into a black hole. It can be particularly useful in scripts and automation tasks where you want to suppress output or simulate empty input.
Filters
we use filters to get desired output . Below are the commands
tac Command
Description:
- The
taccommand is used to reverse the order of lines in a file. It reads the file from the end to the beginning and prints the lines in reverse order.
- The
Example:
If you have a file named
example.txtwith the following content:Line 1 Line 2 Line 3Using
tac:tac example.txtOutput:
Line 3 Line 2 Line 1Using
tactwice (tac file.txt | tac):tac example.txt | tacOutput:
  Line 1
  Line 2
  Line 3
tee Command
Description:
- The
teecommand reads from standard input and writes to both standard output and one or more files.
- The
Example:
If you want to display the contents of a file (
example.txt) on the terminal and also save it to a new file (copy.txt), you can usetee:
cat example.txt | tee copy.txt
grep Command
Basic
grepUsage:grepis a command-line utility for searching patterns in files or command output.Example:
cat /etc/passwd | grep usernamesearches for the string "username" in the contents of the/etc/passwdfile.
Various
grepOptions:-i: Used for case-insensitive searches.Example:
grep -i pattern file.txtignores case while searching for "pattern" infile.txt.
-v: Inverts/ignores the match, i.e., shows lines that do not contain the specified pattern.Example:
grep -v pattern file.txtdisplays lines infile.txtthat do not contain "pattern".
-A: Prints lines after the matched line.Example:
grep -A 3 pattern file.txtdisplays the line containing "pattern" and the next 3 lines infile.txt.
-B: Prints lines before the matched line.Example:
grep -B 2 pattern file.txtdisplays the line containing "pattern" and the 2 lines before it infile.txt.
-C: Prints lines before and after the matched line (context).Example:
grep -C 2 pattern file.txtdisplays the line containing "pattern" and the 2 lines before and after it infile.txt.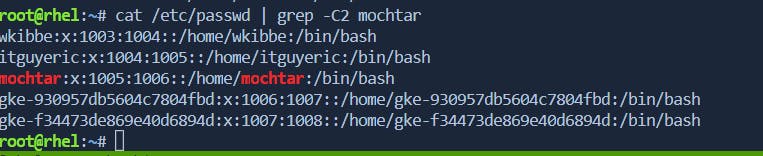
cut Command
The cut command is used for extracting specific sections of text from each line of a file or from the output of another command. Here's a summary of the basic cut command and some advanced use cases:
Basic
cutCommand:The basic syntax of the
cutcommand issyntax:-
cut OPTION... [FILE]It is commonly used to extract specific columns (fields) from lines of text in a file or from command output.
Example:
cut -d':' -f1,3 /etc/passwdextracts the first and third fields (columns) from the/etc/passwdfile, using ":" as the delimiter.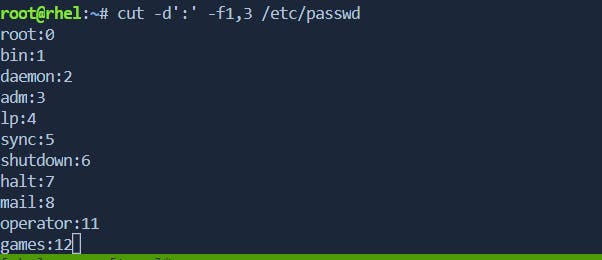
Advanced Uses of
cutCommand:Changing Delimiters (
-doption):# Example: Extract the second field using "|" as the delimiter echo "John|Doe|30" | cut -d'|' -f2
Complementing Fields (
--complementoption):# Example: Extract all fields except the specified ones echo "John,Doe,30" | cut -d',' --complement -f2
Character Ranges (
-coption):# Example: Extract characters 1-5 from each line echo "Hello, World!" | cut -c1-5
Outputting Only Delimited Fields (
-soption):# Example: Output only lines containing the delimiter echo "John,Doe,30" | cut -d',' -s -f2
Specifying Output Delimiter (
--output-delimiteroption):# Example: Change the output delimiter to "|" echo "John,Doe,30" | cut -d',' --output-delimiter='|' -f1,3
Processing Multiple Files:
  # Example: Extract the first field from multiple files
  cut -f1 file1.txt file2.txt
Whitespace Delimiters (
-fwith--output-delimiter):# Example: Extract fields using whitespace as the delimiter and output with "|" echo "John Doe 30" | cut -d' ' --output-delimiter='|' -f1,3
tr Command
The tr command is used in conjunction with a pipeline (|), it becomes a powerful tool for transforming text data. Here's a usage of tr in the context of converting text to uppercase and replacing characters and other uses:
Converting Text to Uppercase:
The
trcommand can be used to convert text to uppercase by translating lowercase letters to their uppercase equivalents.# Example: Convert text to uppercase echo "hello" | tr 'a-z' 'A-Z'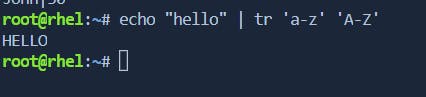
Replacing Characters:
trcan replace characters by specifying a set of characters to be replaced and a corresponding set of replacement characters.# Example: Replace 'a' with 'A' echo "apple" | tr 'a' 'A'
Character Sets:
You can define custom character sets for translation or replacement.
 bashCopy code# Example: Replace vowels with 'X'
 echo "hello" | tr 'aeiou' 'X'
Deleting Characters:
Use the
-doption to delete specified characters.# Example: Delete spaces echo " text with spaces " | tr -d ' '
Squeezing Characters:
The
-soption can be used to squeeze repeated characters into a single instance.# Example: Squeeze consecutive spaces into one echo "too many spaces" | tr -s ' '
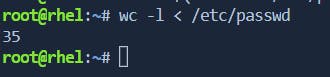
wc Command
wc is used to count the number of lines, words, and characters in a text file. It provides a simple and efficient way to gather basic statistics about the content of a file.
Syntax:
wc [options] [file(s)]
Common options:
-l: Count lines.-w: Count words.-c: Count characters.-m: Count characters (a different approach).
Uses:
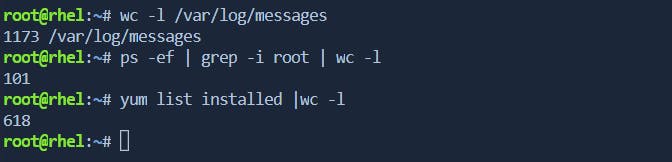
Log Analysis:
- System administrators often use
wcto analyze log files, determining the number of entries, identifying patterns, and assessing the overall log file size. and also check the number of process is running with user and also we can able to count number of packages installed.
- System administrators often use
wc -l /var/log/messages
Monitoring File Growth:
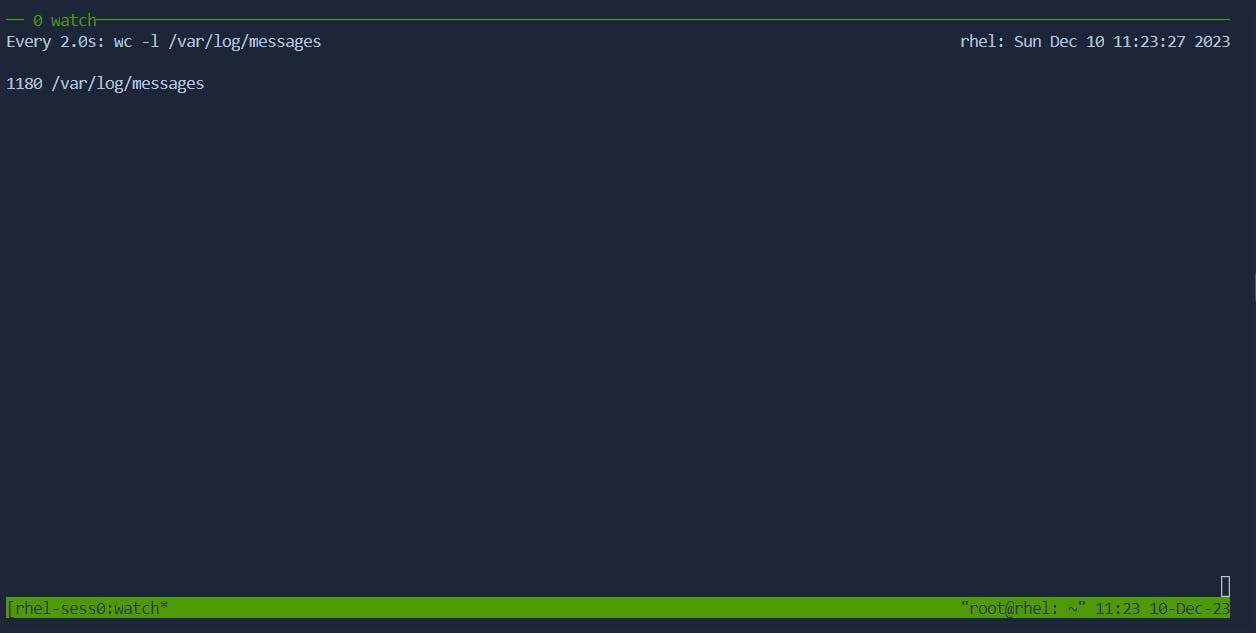
- For monitoring purposes, especially in scenarios where log files or data files are expected to grow over time,
wccan be used to track changes and assess the rate of growth.
- For monitoring purposes, especially in scenarios where log files or data files are expected to grow over time,
watch wc -l /path/to/growing/file.log
Resource Usage Statistics:
- When tracking system resources or analyzing performance logs,
wchelps in obtaining quick statistics about the contents of files.
- When tracking system resources or analyzing performance logs,
cat /proc/cpuinfo | wc -l # Count the number of CPU information lines
Scripting and Automation:
- In scripting,
wcis frequently employed to gather information about files, enabling scripts to make decisions based on the content or size of files.
- In scripting,
    lines=$(wc -l filename.txt | awk '{print $1}')
    if [ $lines -gt 1000 ]; then
        echo "File has more than 1000 lines."
    fi
Count Lines in a File:
lines=$(wc -l filename.txt | awk '{print $1}')
wc -l filename.txt: Counts the number of lines in the filefilename.txt.
awk '{print $1}': Extracts the first part of the output, which is the count of lines.
lines=$(...): Assigns the count of lines to the variablelines.Check if Lines Exceed 1000:
if [ $lines -gt 1000 ]; then
if [ $lines -gt 1000 ]: Checks if the value stored in the variablelinesis greater than 1000.
-gtis a comparison operator meaning "greater than."Print a Message:
echo "File has more than 1000 lines."
echo "File has more than 1000 lines.": Prints a message to the console if the condition in theifstatement is true.
Text Processing Pipelines:
wcis often used as part of a pipeline in combination with other commands for more complex text-processing tasks.
cat *.log | grep "error" | wc -l # Count lines containing the word "error" in multiple log files

Codebase Analysis:
- Developers use
wcto assess the size and complexity of codebases. For example, counting lines of code in a project directory.
- Developers use
find ./src -name '*.c' | xargs wc -l
Disk Space Monitoring:
- Administrators might use
wcin conjunction with commands likeduto estimate the size of directories or files for disk space management.
- Administrators might use
du -h /path/to/directory | cut -f1 | wc -l # Count the number of file
sort & uniq Command
the sort and uniq commands are powerful tools used for manipulating and analyzing text data.
sortCommand: Thesortcommand is designed to sort lines of text in a specified order. Its basic syntax is:sort [options] [file(s)]Some common uses of the
sortcommand include:Sorting lines alphabetically:
sort filenameconsider a simple example where you have a file named
fruits.txtwith the following content:
Now, let's use the
sortcommand to alphabetically sort the lines in the file:
In this example, the
sortcommand arranges the lines in ascending alphabetical order.\===================================
You can also perform numerical sorting if the lines contain numeric values. For instance, if you have a file named
numbers.txtwith the following content:
You can use the
sort -noption to perform numerical sorting:
Reversing the order:
sort -r filename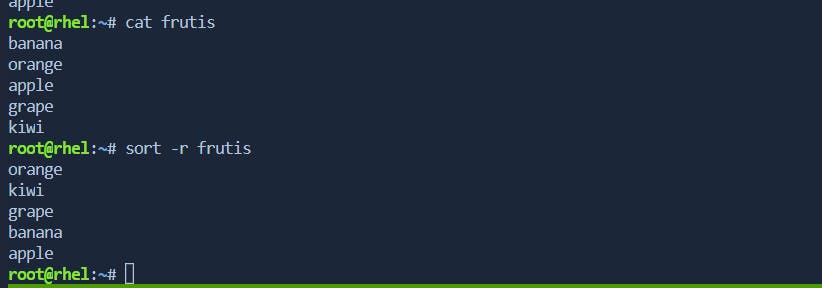
Sorting based on a specific field or column:
sort -k <field> filenameThe
sortcommand can be used to sort data based on a specific field or column using the-koption. The field specification is usually in the formstart[,end], wherestartandendare the starting and ending positions of the field. Fields are typically separated by a delimiter like whitespace or a specific character.Let's consider a file named
employees.txtwith the following content:
Now, let's say you want to sort this data based on the second column (age). The second column starts at position 6 and has a width of 2 characters. You can use the following command:
sort -k2,2 employees.txt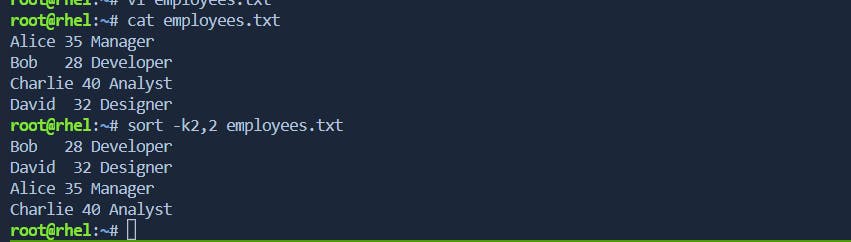
This command sorts the lines based on the content of the second column (age), considering only the characters from position 6 to 7.
If the fields in your data are separated by a delimiter, you can specify the delimiter using the
-toption.For example, let's modify the file to use commas as delimitersNow, to sort based on the second column (age), you can use below command:
sort -t',' -k2,2 file.csv
Handling case-insensitive sorting:
sort -f filenameThe
-foption in thesortcommand is used for case-insensitive sorting. It ensures that uppercase and lowercase letters are treated as identical during the sorting process. Here's an example:Suppose you have a file named
colors.txtwith the following content:Orange blue Green Red YELLOWNow, if you want to perform a case-insensitive sort, you can use the
-foption:sort -f colors.txtThe output will be:
blue
Green
Orange
Red
YELLOW
In this example, the
-foption ensures that the sorting is done in a case-insensitive manner, so "Orange" and "orange" are considered the same, and the lines are sorted accordingly.Without the
-foption, the default behavior would be case-sensitive sorting, and the output would look like:Green Orange Red YELLOW blueUsing the
-foption is particularly useful when you want to sort data where the case of letters should not affect the sorting order.Merging pre-sorted files:
sort -m file1 file2The
sort -mcommand is used to merge pre-sorted files into a single sorted output. This is useful when you have multiple sorted files, and you want to combine them into a single sorted file without re-sorting the entire data set. Here's an example:Let's consider two pre-sorted files,
sorted_file1.txtandsorted_file2.txt:sorted_file1.txt:
apple
banana
grape
sorted_file2.txt:
kiwi
orange
watermelon
Now, you can use the
sort -mcommand to merge these files into a single sorted output:sort -m sorted_file1.txt sorted_file2.txtThe resulting output will be:
apple
banana
grape
kiwi
orange
watermelon
The
sort -mcommand efficiently combines the pre-sorted files while maintaining the overall sort order. This can be particularly useful when dealing with large datasets that are already sorted, as it avoids the need to re-sort the entire data.Note: The input files must be sorted for the
sort -mcommand to work as intended. If the input files are not sorted, the merged output may not be correctly sorted.
uniqCommand: Theuniqcommand is used to filter and display unique lines from a sorted file or input. Its basic syntax is:uniq [options] [input]Common uses of the
uniqcommand include:Removing duplicate adjacent lines:
uniq filenameThe
uniqcommand is often used to remove duplicate adjacent lines in a sorted file. Here's an example:Let's say you have a file named
colors.txtwith the following content:red blue blue green green yellow
Now, you can use the
sortcommand to sort the lines and then useuniqto remove adjacent duplicates:sort colors.txt | uniq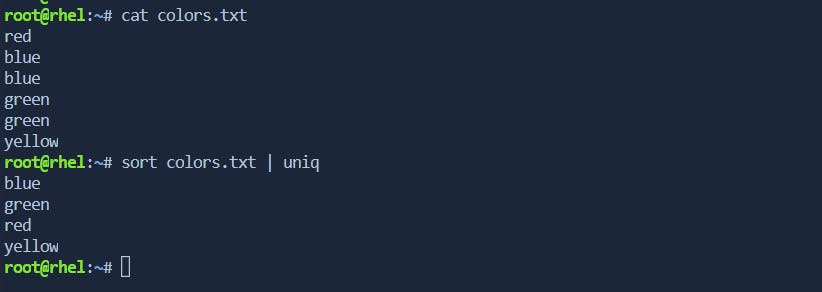
In this example, the
sortcommand sorts the lines alphabetically, and then theuniqcommand removes adjacent duplicate lines. The result is a list of unique colors.It's important to note that
uniqremoves only adjacent duplicates, so the input data needs to be sorted for it to work effectively in this context. If the file is not sorted, you can usesortbefore applyinguniq:sort unsorted_colors.txt | uniqThis ensures that the adjacent duplicate lines are brought together by sorting before
uniqremoves them.Counting and displaying the number of occurrences of each unique line:
uniq -c filenameyou have a file named
fruits.txtwith the following content:orange apple banana apple orange banana orangeYou can use the
sortanduniq -ccommands together to count and display the number of occurrences of each unique line. Here's the command:sort fruits.txt | uniq -c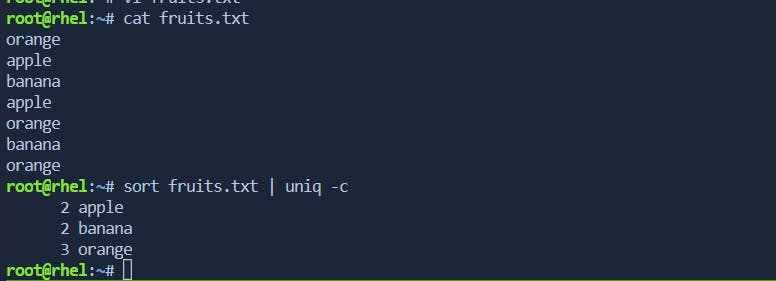
In this example, the
sortcommand arranges the lines of the file in alphabetical order, and then theuniq -ccommand counts and displays the number of occurrences for each unique line.Displaying only repeated lines:
uniq -d filenamethe
sortcommand in conjunction withuniq -dto display only the repeated lines from a file. Assume you have a file namedexample.txtwith the following content:apple orange banana apple grape orange bananaNow, let's use the
sortcommand followed byuniq -dto display only the repeated lines:sort example.txt | uniq -dThe output will be:
apple
banana
orange
This result shows only the lines that are repeated in the file after sorting. In this example, "apple," "banana," and "orange" are the lines that appear more than once in the original unsorted file. The
sortcommand is crucial in preparing the data foruniqto identify and display the repeated lines.Suppressing output of repeated lines, showing only unique lines:
uniq -u filenamehave a file named
fruits.txtwith the following content:apple orange banana apple grape orange bananaYou can use the
sortcommand to sort the lines alphabetically and then useuniq -uto suppress the output of repeated lines, showing only unique lines. Here's the example:sort fruits.txt | uniq -uThe output would be:
grapeExplanation:
The
sortcommand arranges the lines in alphabetical order.The
uniq -ucommand suppresses the output of repeated lines, displaying only the lines that occur exactly once in the sorted list. In this case, "grape" is the only line that is unique in the sorted list.
comm Command
The comm command is a Unix utility that is used to compare two sorted text files line by line. It identifies lines that are unique to each file and lines that are common to both files. The command has three columns in its output: lines unique to the first file, lines unique to the second file, and lines common to both files. The comm command is particularly useful for finding differences and similarities between files, and it is often employed in scripting and text-processing tasks.
Syntax:
comm [OPTION]... FILE1 FILE2
Key Options:
-1: Suppress lines unique to the first file.Suppose we have two sorted files,
file1.txtandfile2.txt: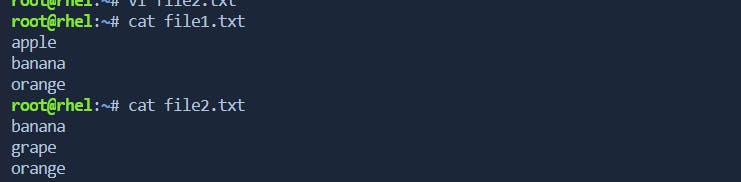
Now, let's use the
commcommand with the-1option:
In this example, the lines unique to the first file (
file1.txt) are suppressed, and only the lines common to both files and unique to the second file are displayed-2: Suppress lines unique to the second file.Using the same files, let's now suppress lines unique to the second file:

This time, the lines unique to the second file (
file2.txt) are suppressed, and only the lines common to both files and unique to the first file are displayed.-3: Suppress lines common to both files.Now, let's suppress lines common to both files:
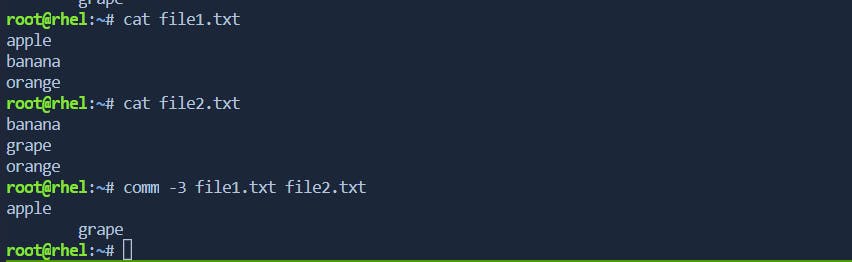
This output shows only the lines that are unique to each file.
od Command Summary:
The od command, which stands for "octal dump," is a Unix utility that displays the content of a file in various formats, including octal, decimal, hexadecimal, and ASCII. It is commonly used to examine the contents of binary files, analyze file structures, and debug data. od is a versatile tool that allows users to customize the output format and control the number of bytes displayed per line. It is often used in conjunction with other commands and utilities for file manipulation and analysis.
Syntax:
od [OPTION]... [FILE]...
Key Options:
-A: Select the output format (ofor octal,xfor hexadecimal,dfor decimal).# Create a file with some binary data echo -e "\x48\x65\x6C\x6C\x6F\x20\x57\x6F\x72\x6C\x64" > binary_file # Use od to display the content in hexadecimal format od -A x binary_fileExplanation:
# Create a file with some binary data: This line uses theechocommand to generate a sequence of bytes and writes them to a file namedbinary_file. The-eoption enables the interpretation of backslash escapes, and\xis used to specify hexadecimal values for the ASCII characters.The hexadecimal values are:
48(H),65(e),6C(l),6C(l),6F(o),20(space),57(W),6F(o),72(r),6C(l),64(d).So, the content of
binary_fileis "Hello World" in ASCII.
# Use od to display the content in hexadecimal format: This line uses theodcommand to display the content of thebinary_file. The-A xoption specifies the output format as hexadecimal.- The command
od -A x binary_filereads the content of the file and displays it in hexadecimal format.
- The command
Explanation of the
odOutput:0000000 4865 6c6c 6f20 576f 726c 640a 00000140000000: This is the offset or address in hexadecimal where the output begins.4865 6c6c 6f20 576f 726c 640a: These are the hexadecimal representations of the ASCII characters in the file.48corresponds toH,65toe,6Ctol, and so on.640arepresents the newline character (\n), indicating the end of the line.
0000014: This is the next offset, indicating the end of the output.
So, the output of the
od -A x binary_filecommand displays the hexadecimal representation of the ASCII characters in thebinary_file, confirming that it contains the string "Hello World".-t: Specify the format of the output.# Create a file with decimal numbers echo -e "10\n20\n30\n" > decimal_file # Use od to display the content in octal format od -t o1 decimal_fileOutput:
0000000 012 0 001 002 015 0 002 004 015 0 003 006
0000014
Here, the
-t o1option specifies that the output format should be octal (o) and with one byte per line (1).-j: Skip a specified number of bytes before starting the dump.# Create a file with some text echo "This is a sample text file." > text_file # Use od to skip the first 10 bytes and display the content od -j 10 -c text_fileOutput:
0000000  a   s   a   m   p   l   e       t   e   x   t       f   i   l   e   .
0000020
In this example, the
-j 10option skips the first 10 bytes of the file before starting the dump.-N: Limit the number of bytes to be dumped.# Create a file with some ASCII characters echo "ABCDEFG" > ascii_file # Use od to display only the first 4 bytes od -N 4 -c ascii_fileOutput:
0000000   A   B   C   D
0000004
Here, the
-N 4option limits the output to the first 4 bytes of the file.
awk Command
awkis a powerful and versatile programming language mainly used for text processing and data extraction on Unix and Unix-like systems. It operates on a line-by-line basis, making it suitable for processing structured text files, such as CSV or log files. The basic syntax of anawkcommand is:awk 'pattern { action }' input_file
Pattern: Specifies a condition or a regular expression that determines when to execute the associated action.
Action: Defines the set of commands or operations to be performed when the specified pattern is matched.
Examples with Output:
Print Specific Columns from a CSV File:
awk -F',' '{print $1, $3}' data.csv
Input:
  Name, Age, City
  Alice, 25, New York
  Bob, 30, San Francisco
  Charlie, 22, Los Angeles
Output:
  Name City
  Alice New York
  Bob San Francisco
  Charlie Los Angeles
Filter Lines Based on a Condition:
awk '$2 > 20' data.txt
Input:
  Alice 25
  Bob 18
  Charlie 30
Output:
  Alice 25
  Charlie 30
Calculate and Print Average:
awk '{sum += $1} END {print "Average:", sum/NR}' numbers.txt
Input:
  10
  20
  30
Output:
Average: 20Print Lines Matching a Pattern:
awk '/error/' logfile.txt
Input:
  [INFO] This is a log message.
  [ERROR] Something went wrong.
  [DEBUG] Debugging information.
Output:
[ERROR] Something went wrong.
Basic Unix Tools
date & timedatectl Command
date and timedatectl are commands in Unix-like operating systems that are used for managing the system clock and date settings. The system clock is crucial for various system functions, including logging, scheduling tasks, and maintaining accurate timestamps.
date: This command is used to display or set the system date and time. It can also be used to show the current time in a specified format.
timedatectl: This command is part of the
systemdsystem and service manager and is used for querying and changing the system clock and its settings. It provides more advanced features than the traditionaldatecommand.
Troubleshooting Scenarios:
Incorrect Date/Time:
Symptom: The system clock displays the wrong date or time.
Solution:
Use the
datecommand to manually set the correct date and time.Check the system's time zone settings using
timedatectland adjust if necessary.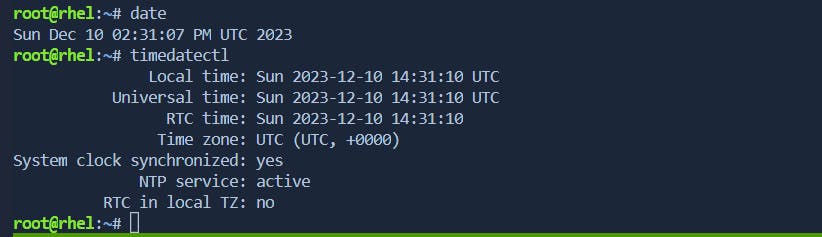
NTP Service Issues:
Symptom: The system clock is drifting, and NTP (Network Time Protocol) synchronization is not working.
Solution:
Ensure the NTP service is installed (
ntppackage) and running.Use
timedatectlto check the NTP synchronization status (timedatectl status).Restart the NTP service (
systemctl restart ntporsystemctl restart systemd-timesyncddepending on the system).
NTP Service Not Starting:
Symptom: The NTP service fails to start.
Solution:
Check the NTP service logs for errors (
journalctl -xe | grep ntp).Ensure the NTP configuration file (
/etc/ntp.confor/etc/systemd/timesyncd.conf) is correctly configured.Verify that there are no conflicts with other time synchronization services.
Manual Time Adjustment:
Symptom: Manually setting the time using
datedoesn't persist after a reboot.Solution:
Use
timedatectl set-time 'YYYY-MM-DD HH:MM:SS'to set the time. This ensures the time persists across reboots.Verify that the system's hardware clock (
hwclock) is synchronized with the adjusted system time.
Checking System Clock Status:
Symptom: Uncertainty about the current status of the system clock.
Solution:
Use
timedatectl statusto get detailed information about the current system clock settings, including the time, time zone, and NTP synchronization status.Utilize
dateto quickly check the current date and time without additional details.
cal Command:
The cal command is used to display a calendar in the terminal. It can show calendars for a specific month or an entire year.
Examples:
Display the current month's calendar:
calOutput:
 December 2023
 Su Mo Tu We Th Fr Sa
                    1
  2   3   4   5   6   7   8
  9  10  11  12  13  14  15
 16  17  18  19  20  21  22
 23  24  25  26  27  28  29
 30  31
Display the calendar for a specific month and year:
cal 06 2022Output:
 June 2022
 Su Mo Tu We Th Fr Sa
        1   2   3   4
  5   6   7   8   9  10
 11  12  13  14  15  16  17
 18  19  20  21  22  23  24
 25  26  27  28  29  30
sleep Command:
The sleep command is used to delay the execution of a script or command for a specified amount of time. It's often used in shell scripts for pausing execution.
Examples:
Pause execution for 5 seconds:
sleep 5This command will wait for 5 seconds before returning to the command prompt.
Use
sleepin a script to create a delay:#!/bin/bash echo "This is the first line." sleep 3 echo "This line appears after a 3-second delay."Save the script, and make it executable (
chmod +xscript.sh), and then run it.Output:
 This is the first line.
 [3-second pause]
 This line appears after a 3-second delay.
Compression & Archiving
Linux administrators often deal with large amounts of data that need to be compressed and archived efficiently. In the world of Linux, several powerful tools are available to handle compression and archiving tasks. In this article, we will explore gzip, zcat, bzip2, bzcat, bunzip, and tar, and delve into their advanced options that can make the life of a Linux administrator much easier.
Gzip: The Classic Compression Tool
Overview: gzip is a widely used compression tool that reduces the size of files, making them easier to transfer and save space on disk.
Basic Usage:
gzip filename
Advanced Options:
-dor--decompress: Decompress a gzip-compressed file.-cor--stdout: Write output to standard output without modifying the original file.-ror--recursive: Recursively compress or decompress files in directories.-9or--best: Use the maximum compression level.
Zcat: Viewing Compressed Files
Overview: zcat is a utility that allows you to view the contents of compressed files without decompressing them.
Basic Usage:
zcat filename.gz
Advanced Options:
-for--force: Force zcat to decompress files, even if they don't have the .gz extension.
Bzip2: High Compression Ratio
Overview: bzip2 is another compression tool known for its high compression ratio.
Basic Usage:
bzip2 filename
Advanced Options:
-dor--decompress: Decompress a bzip2-compressed file.-cor--stdout: Write output to standard output without modifying the original file.-kor--keep: Keep the original file when compressing or decompressing.-9or--best: Use the maximum compression level.
Bzcat: Viewing bzip2-Compressed Files
Overview: bzcat is the equivalent of zcat for bzip2-compressed files.
Basic Usage:
bzcat filename.bz2
Advanced Options:
- Similar to zcat, bzcat does not have many advanced options.
Bunzip: Decompressing bzip2 Files
Overview: bunzip is used to decompress files compressed with bzip2.
Basic Usage:
bunzip2 filename.bz2
Advanced Options:
-kor--keep: Keep the original file when decompressing.
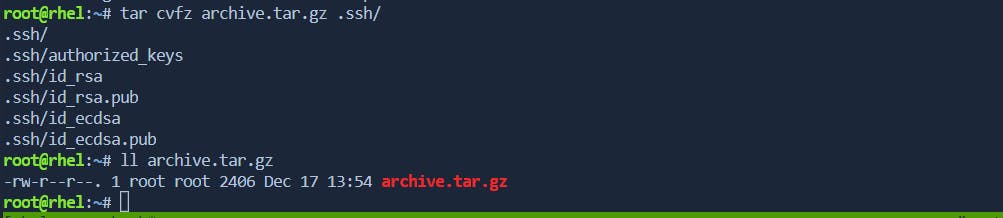
Tar
Tar, short for tape archive, is a versatile command-line utility used by Linux administrators to compress and archive files and directories. In real-time Linux environments, where efficiency and performance are critical, mastering the various options of the tar command is essential.
- -cvf: Creating a Tar Archive
tar: The command itself, used for archiving and extracting files.-cvf:-c: Stands for "create." This option instructstarto create a new archive.-v: Stands for "verbose." It enables the verbose mode, providing detailed information about the files being archived.-f: Stands for "file." It specifies the name of the archive file.
archive.tar: This is the name of the tar archive that will be created.files/: The directory (or file) to be included in the archive. You can replacefiles/with the actual path to the directory or file you want to archive.
tar -cvf archive.tar files/

- -cvfz: Compressing with gzip
To compress the tar archive using gzip, the -z option is added. This is particularly useful for saving disk space and speeding up file transfers.
tar cvfz archive.tar.gz files/
- -cvfj: Compressing with bzip2
Similar to the -cvfz option, the -cvfj option compresses the tar archive, but it uses the bzip2 compression algorithm. Bzip2 often provides higher compression ratios at the cost of slightly increased compression time.
tar cvfj archive.tar.bz2 files/

- -tvf: Viewing the Contents of a Tar Archive
The -tvf option allows administrators to view the contents of a tar archive without extracting them. This is beneficial for quickly checking the contents of an archive before performing any operations.
tar -tvf archive.tar

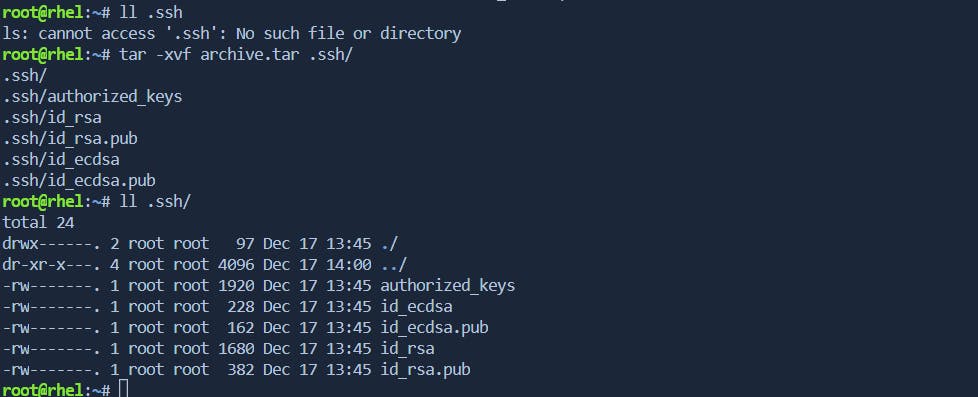
- -xvf: Extracting Files from a Tar Archive
The -xvf option is used for extracting files from a tar archive. It stands for "extract," "verbose," and "file." This option is essential for deploying files or restoring backups.
tar -xvf archive.tar
- -cvfp: Preserve Permissions and Ownership
In real-time Linux environments, preserving file permissions and ownership is crucial. The -p option ensures that the original permissions and ownership of the files are maintained when creating or extracting a tar archive.
tar -cvfp archive.tar files/


Find
The find command in Linux is a powerful and versatile tool that allows system administrators to search for files and directories based on various criteria. Whether you're looking for specific file types, searching by permissions, or identifying resource-intensive files, find is your go-to solution. In this article, we will explore the syntax of the find command, delve into the most commonly used options, and demonstrate how it can be employed to locate and manage files effectively.
Basic Syntax of the Find Command
The basic syntax of the find command is as follows:
find [starting_directory] [options] [expression]
starting_directory: Specifies the directory where the search begins.options: Refers to the various flags and parameters that modify the behavior of thefindcommand.expression: Defines the search criteria for files and directories.
Commonly Used Options by Linux Administrators
Search for Files Based on Size:
To find files larger than a specific size:
find /path/to/search -size +100M
To find files smaller than a specific size:
find /path/to/search -size -1G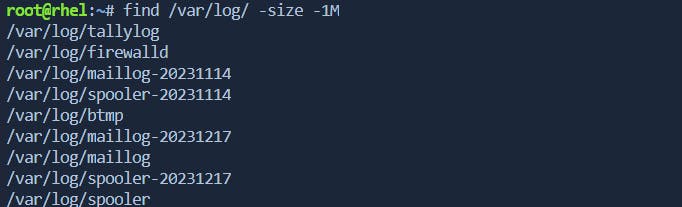
Identify Resource-Intensive Files:
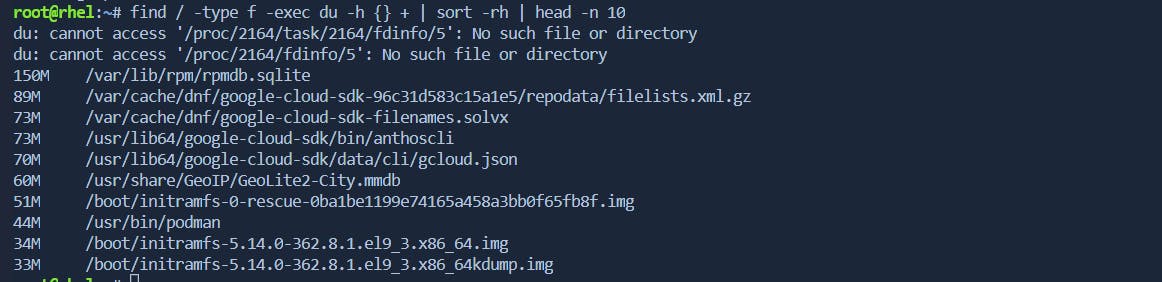
To search for the most consuming files in the root filesystem:
find / -type f -exec du -h {} + | sort -rh | head -n 10find / -type f: This part of the command instructsfindto search for files (-type f) starting from the root directory (/).-exec du -h {} +: For each file found byfind, theducommand is executed to estimate its disk usage (-hfor human-readable output). The{}placeholder represents the file name, and+at the end of-execis used to pass multiple file names to a single invocation of theducommand, which can be more efficient.|: The pipe symbol (|) is used to redirect the output of thefindcommand to the next command.sort -rh: Thesortcommand is used to sort the output based on file sizes. The options-rindicate reverse order (largest to smallest), and-hensures that the sizes are treated as human-readable (e.g., 1K, 1M).head -n 10: Finally, theheadcommand is used to display only the top 10 lines of the sorted output, effectively showing the 10 largest files in the filesystem.
Search for Specific File Types:
To find all PDF files in a directory:
find /path/to/search -type f -name "*.pdf"
Search Based on File Permissions:
To find files with specific permissions (e.g., read and write for owner):
find /path/to/search -type f -perm -u=rw -exec ls -l {} ;
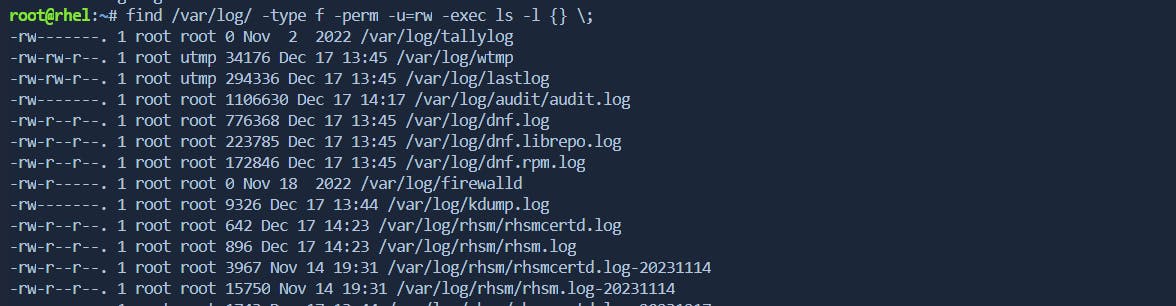
find /path/to/search: Specifies the starting directory for the search.-type f: Limits the search to regular files (not directories or other types of files).-perm -u=rw: Filters files based on permissions. In this case, it looks for files where the owner has both read and write permissions.-exec ls -l {} \;: For each file found byfind, thels -lcommand is executed to provide detailed information about the file, including permissions, owner, group, size, and modification date.
Finding Hidden and Empty Files:
Find Hidden Files
find /path/to/search -type f -name ".*" -exec ls -l {} \;This command searches for hidden files (those starting with a dot) in the specified directory and displays detailed information using
ls -l.Find Empty Files
find /path/to/search -type f -emptyThis command searches for empty files in the specified directory (
/path/to/search).
Using Time and Size Filters:
Find Files Accessed Within the Last 7 Days
find /path/to/search -type f -atime -7
This command searches for files in the specified directory that were accessed within the last 7 days.
i. Find Files Modified Within the Last 30 Days
find /path/to/search -type f -mtime -30
This command searches for files in the specified directory that were modified within the last 30 days.
ii. Find Files Modified in the Last 15 Minutes
find /path/to/search -type f -mmin -15
This command searches for files in the specified directory that were modified in the last 15 minutes.
iii. Find Files Larger Than 1 GB
find /path/to/search -type f -size +1G
This command searches for files in the specified directory that are larger than 1 gigabyte.
iv. Find Files Smaller Than 100 Kilobytes
find /path/to/search -type f -size -100k
This command searches for files in the specified directory that are smaller than 100 kilobytes.
v. Find Files Modified More Recently Than a Reference File
find /path/to/search -type f -newer /path/to/referencefile
This command searches for files in the specified directory that were modified more recently than the specified reference file.
vi. Find Files Modified Older Than a Reference File
find /path/to/search -type f -older /path/to/referencefile
This command searches for files in the specified directory that were modified earlier than the specified reference file.
Locate
The locate command in Linux is a fast and efficient way to find the location of files and directories on the system. It relies on a pre-built index of the file system, making it much quicker than commands like find for locating files. Here are some real-time usage examples of the locate command with expected outputs:
- Find the Location of a File
locate myfile.txt
Output:
/home/user/documents/myfile.txt
This command searches for the file named myfile.txt and returns the absolute path to its location.
- Search for Files Matching a Pattern
locate *.log
Output:
/var/log/syslog
/var/log/auth.log
/home/user/documents/server.log
This command searches for files with a .log extension and displays a list of matching files.
- Case-Insensitive Search
locate -i MyFile
Output:
/home/user/documents/MyFile.txt
/home/user/downloads/myfile.TXT
The -i option performs a case-insensitive search for files containing the specified string.
- Update the Locate Database
sudo updatedb
Output:
(no visible output)
This command updates the locate database, which is necessary to ensure the results are up-to-date. It is typically run with sudo because it requires administrative privileges.
- Limiting Results to a Specific Directory
locate -r '/var/log/.*\.log$'
Output:
/var/log/syslog
/var/log/auth.log
This command searches for files matching the regular expression /var/log/.*\.log$ and limits the results to the /var/log/ directory.
- Exclude Specific Paths from Search
locate myfile.txt --exclude /home/user/documents
Output:
/var/www/html/myfile.txt
This command searches for myfile.txt but excludes results from the /home/user/documents directory.
- Display the Number of Matches
locate -c myfile.txt
Output:
3
This command counts and displays the number of occurrences of myfile.txt in the file system.
Example 8: Locate Binary Executables
locate -b '\wget'
Output:
/usr/bin/wget
This command searches for the binary executable wget using the -b option.
Keep in mind that the locate command might not be installed by default on all Linux distributions. If it's not installed, you can typically install it using your package manager, such as sudo apt-get install mlocate on Debian-based systems or sudo yum install mlocate on Red Hat-based systems.
Regular Expression
Regular expressions, often abbreviated as regex or regexp, are powerful tools for searching, matching, and manipulating text based on patterns. In Red Hat Enterprise Linux (RHEL), regular expressions are widely used in various commands and utilities, providing administrators and users with a flexible way to work with text data.
Basics of Regular Expressions:
Regular expressions consist of characters and metacharacters that define patterns. Here are some fundamental concepts:
Literal Characters: Match themselves (e.g.,
abcmatches the sequence "abc").Metacharacters: Special characters with a specific meaning. Common metacharacters include
.(matches any character)*(matches zero or more occurrences)+(matches one or more occurrences)^(matches the beginning of a line)$(matches the end of a line).
Different Types of Regular Expressions:
1. Basic Regular Expression (BRE):
BRE is the default regular expression syntax in many Unix utilities.
Example: Search for lines starting with "error" in a log file:
grep '^error' /var/log/messages
2. Extended Regular Expression (ERE):
ERE extends the functionality of BRE and is supported by some utilities like egrep or grep -E.
Example: Search for lines containing either "error" or "warning" in a log file:
egrep 'error|warning' /var/log/messages
3. Perl Compatible Regular Expression (PCRE):
PCRE is more advanced and used in languages like Perl.
Example: Extract all email addresses from a text file:
grep -P -o '\b[A-Za-z0-9._%+-]+@[A-Za-z0-9.-]+\.[A-Z|a-z]{2,}\b' file.txt
Real-Life Use Cases:
Log Analysis:
grep 'ERROR\|CRITICAL' /var/log/sysloggrep: This command is used for searching text patterns in files.'ERROR\|CRITICAL': This is the regular expression pattern being searched. The\|is used as an "OR" operator, indicating that either "ERROR" or "CRITICAL" should be matched./var/log/syslog: This is the path to the file being searched. In this case, it's the syslog file located in the/var/logdirectory.
When you run this command, it will display lines from the syslog file that contain either "ERROR" or "CRITICAL". The output will include the lines that match the specified pattern.
Network Configuration:
ip a | grep -E 'inet [0-9]+\.[0-9]+\.[0-9]+\.[0-9]+'It is used to extract lines from the
ip acommand's output that contains IPv4 addresses. Let's break down the components of this command:ip a: This command is used to show information about network interfaces.|: The pipe symbol is used to redirect the output of theip acommand to the next command.grep -E 'inet [0-9]+\.[0-9]+\.[0-9]+\.[0-9]+': This is thegrepcommand with extended regular expression (ERE) matching.-E: Enables extended regular expressions, allowing the use of+for "one or more" occurrences.'inet [0-9]+\.[0-9]+\.[0-9]+\.[0-9]+': This is the regular expression pattern being searched. It looks for lines containing the word "inet" followed by an IPv4 address.
When you run this command, it will display lines from the ip a command's output that contains IPv4 addresses. The output might look something like this:
    inet 192.168.1.2/24 brd 192.168.1.255 scope global eth0
    inet 10.0.0.1/8 brd 10.255.255.255 scope global eth1
Process Management:
ps aux | grep -E 'nginx|apache2'command is used to list information about processes running on the system and then filter those results to only show lines that contain either "nginx" or "apache2". Let's break down the components of this command:
ps aux: This command lists information about all processes currently running on the system.|: The pipe symbol redirects the output of theps auxcommand to the next command.grep -E 'nginx|apache2': This is thegrepcommand with extended regular expression (ERE) matching.-E: Enables extended regular expressions, allowing the use of|for "OR" between patterns.'nginx|apache2': This is the regular expression pattern being searched. It looks for lines containing either "nginx" or "apache2".
When you run this command, it will display lines from the ps aux command's output where the process command or details include either "nginx" or "apache2". The output might look something like this:
    user    1234  0.0  0.1  12345  6789 ?        Ss   Dec01   0:00 nginx: master process /usr/sbin/nginx -g daemon on; master_process on;
    user    5678  0.0  0.2  23456  9876 ?        S    Dec01   0:00 nginx: worker process
    another 9876  0.0  0.1  34567  5432 ?        S    Dec01   0:00 apache2 -k start
Extracting Data:
cat data.txt | grep -P -o '\b\d{3}-\d{2}-\d{4}\b'It is used to search for and extract date patterns in the form of "###-##-####" from the content of the
data.txtfile. Let's break down the components of this command:cat data.txt: This command displays the content of thedata.txtfile.|: The pipe symbol redirects the output of thecatcommand to the next command.grep -P -o '\b\d{3}-\d{2}-\d{4}\b': This is thegrepcommand with Perl Compatible Regular Expression (PCRE) matching.-P: Enables Perl Compatible Regular Expressions.-o: Outputs only the matched part of the line.'\b\d{3}-\d{2}-\d{4}\b': This is the regular expression pattern being searched. It looks for a date pattern in the form of "###-##-####".
When you run this command, it will display only the parts of the lines in data.txt that match the specified date pattern. The output might look something like this:
    202-12-01
    456-11-2023
    ...
File Content Search:
find /etc -type f -exec grep -H 'pattern' {} +
It is used to search for files in the /etc directory and its subdirectories, then perform a case-sensitive search for the specified 'pattern' within each file. Let's break down the components of this command:
find /etc: This command searches for files and directories in the/etcdirectory.-type f: This option specifies that only regular files should be considered, excluding directories and other types of files.-exec grep -H 'pattern' {} +: For each file found byfind, thegrepcommand is executed to search for the specified 'pattern'. The-Hoption ensures that the filename is printed along with the matching lines. The{}placeholder represents the list of files found, and+at the end of-execis used to pass multiple file names to a single invocation of thegrepcommand, which can be more efficient.
When you run this command, it will display lines containing the specified 'pattern' along with the filenames in which the pattern is found. The output might look something like this:
/etc/file1: This is the line containing the pattern.
/etc/file2: Another line with the pattern.
...
Sed
sed, or stream editor, is a powerful text processing tool in Linux that performs basic text transformations on input streams. It is widely used for editing and transforming text in a non-interactive manner, making it an essential tool for scripting and automation.
Basic Usage and Regular Expressions:
1. Substitute Command (s):
The s command is used to substitute one string with another.
echo "Hello, World!" | sed 's/Hello/Hi/'
Output:
Hi, World!
2. Global Replacement:
Use the g flag to replace all occurrences in a line.
echo "apple apple orange" | sed 's/apple/banana/g'
Output:
banana banana orange
3. Permanent Replacement in File:
To make changes in a file permanently, use the -i option.
sed -i 's/old/new/' filename
4. Add Character Before String:
Insert a character before a specific string.
echo "123456" | sed 's/./,&/g'
Output:
1,2,3,4,5,6,
Advanced Real-Time Uses:
1. Replacing Text in Configuration Files:
sed -i 's/old_value/new_value/' /etc/config_file.conf
It is used to perform an in-place replacement of the "old_value" with the "new_value" in the specified file (/etc/config_file.conf). Let's break down the components of this command:
sed: The stream editor command.-i: The-ioption stands for "in-place." It modifies the file directly, saving the changes without creating a backup.'s/old_value/new_value/': This is the substitution command. It tellssedto search for "old_value" and replace it with "new_value."/etc/config_file.conf: This is the path to the file where the replacement should occur.
When you run this command, sed reads the contents of the specified file, performs the substitution, and writes the changes back to the same file. Here's an example of how it works:
Let's assume /etc/config_file.conf initially contains the following line:
parameter=old_value
After running the sed command:
sed -i 's/old_value/new_value/' /etc/config_file.conf
The content of /etc/config_file.conf will be updated to:
parameter=new_value
2. Adding a User to the sudoers file:
sed -i '/^root/a new_user ALL=(ALL:ALL) ALL' /etc/sudoers
It is used to append a new line granting sudo privileges to a user (new_user in this case) in the /etc/sudoers file. Let's break down the components of this command:
sed: The stream editor command.-i: The-ioption stands for "in-place," modifying the file directly.'/^root/a new_user ALL=(ALL:ALL) ALL': This is thesedcommand with the following parts:/^root/: Specifies the pattern to match. In this case, it looks for lines that start with "root."a: Stands for "append." It instructssedto append the specified text on a new line after the line matching the pattern.new_user ALL=(ALL:ALL) ALL: The text to be appended. It grants sudo privileges to the user "new_user."
/etc/sudoers: This is the path to the file where the modification should occur, typically the sudoers configuration file.
When you run this command, sed reads the contents of the sudoers file, searches for a line starting with "root," and appends the specified line granting sudo privileges to "new_user." Here's an example of how the sudoers file might look before and after running this command:
Before:
# Some lines in the sudoers file
root    ALL=(ALL:ALL) ALL
# More lines in the sudoers file
After:
# Some lines in the sudoers file
root    ALL=(ALL:ALL) ALL
new_user ALL=(ALL:ALL) ALL
# More lines in the sudoers file
This is a convenient way to add or modify sudo permissions for users in the sudoers file without manually editing it. However, always exercise caution when modifying system files and consider creating backups before making changes.
3. Extracting Information from Log Files:
grep 'ERROR' /var/log/syslog | sed 's/^.*ERROR: \(.*\)$/\1/'
It is used to filter lines in the /var/log/syslog file that contain the word "ERROR" and then use sed to extract the content within parentheses following the "ERROR:" substring. Let's break down the components of this command:
grep 'ERROR' /var/log/syslog: This part of the command usesgrepto filter lines in the/var/log/syslogfile that contain the word "ERROR."|: The pipe symbol (|) is used to redirect the output of thegrepcommand to the next command (sedin this case).sed 's/^.*ERROR: \(.*\)$/\1/': This is thesedcommand with the following parts:s/^.*ERROR: \(.*\)$/\1/: This is a substitution command. It captures the content within parentheses following "ERROR:" and replaces the entire line with the captured content.^.*ERROR: \(.*\)$: This part matches the entire line starting from the beginning until "ERROR:" and captures the content within parentheses.\1: This is a backreference to the content captured within parentheses. It replaces the entire line with the captured content.
When you run this command, it will display only the content within parentheses for lines that contain the word "ERROR" in the /var/log/syslog file. Here's an example of how it works:
Assuming a line in /var/log/syslog looks like this:
Dec 15 10:30:45 server1 kernel: ERROR: Something went wrong! (Error details)
The output of the command would be:
Error details
This command is useful for extracting specific details from log files, especially when errors or relevant information is surrounded by additional context. Adjust the command based on the actual structure of the log entries and the information you want to extract.
4. Formatting CSV Files:
echo "name,age,city" | sed 's/,/ | /g'
Output:
name | age | city
5. Numbering Lines:
sed = filename | sed 'N;s/\n/\t/'
Output:
1   Line 1
2   Line 2
3   Line 3
...
sedin Single User Mode:
In Single User Mode, sed can be invaluable for repairing or modifying critical system files. For instance, correcting configurations, fixing user authentication issues, or modifying startup scripts.
Example: Resetting a Forgotten Root Password in Single User Mode:
Boot into Single User Mode.
Remount the root filesystem in read-write mode:
mount -o remount,rw /Use
sedto edit the/etc/shadowfile and replace the encrypted password with a known one:sed -i 's/^root:.*$/root:$6$yournewpassword$othercharacters/' /etc/shadow
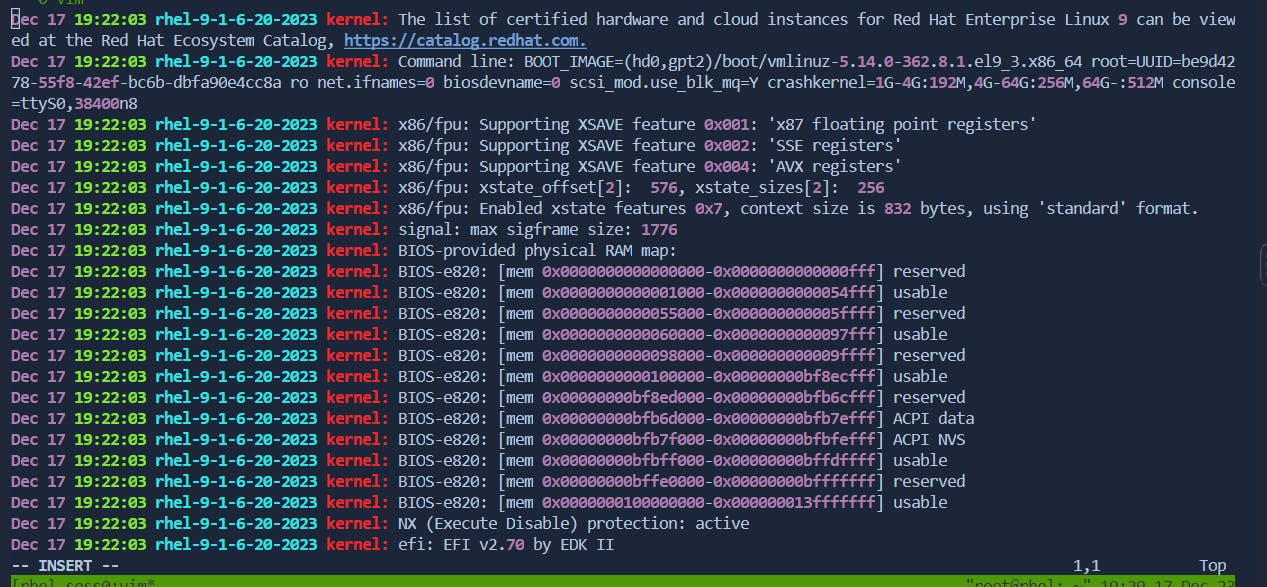
VI editor
Vi and Vim are text editors widely used in Unix and Linux environments. Vim, short for "Vi Improved," is an enhanced version of the original Vi editor. Both editors provide powerful features for text editing, including various modes, commands, and extensibility.
Installing Vim Editor in RHEL:
To install Vim on Red Hat Enterprise Linux (RHEL), you can use the following command:
sudo yum install vim
This command installs Vim and its dependencies on your system.
Vi and Vim Modes:
1. Command Mode:
In command mode, you can navigate the document, perform operations, and issue commands.
To enter command mode, press
Esc. When you in insert mode
2. Insert Mode:
In insert mode, you can insert or edit text.
To enter insert mode:
Press
ito insert before the cursor.Before:
After:
Press
Ito insert at the beginning of the line.Before:

After:
Press
ato append after the cursor.Before:

After:

Press
Ato append at the end of the line.Before:

After:

Press
oto open a new line below the current line.Before:

After:

Press
Oto open a new line above the current line.Before:

After:

3. Delete Mode:
In command mode, you can delete characters, lines, or entire words.
To delete:
Press
xto delete the character under the cursor.Before:

After:
Press
ddto delete the entire line.Before:

After:

Press
dwto delete from the cursor to the end of the current word.Before:

After:
Press
dbto delete from the cursor to the beginning of the current word.Before:

After:

4. Saving and Exiting:
In command mode, you can save changes and exit using the :wq command.
Press
:to enter command-line mode.Type
wqand pressEnterto save and exit.

5.Undo and Redo:
Undo: In command mode, press
uto undo the last change.Redo: Press
Ctrl+rto redo the undone change.Undo :[u]
Before:


After:

Redo: [ctrl+r]
Before:

After:

6. Replace Character:
Replace: In command mode, position the cursor over the character to replace, and press
r, and then type the replacement character.Before:

After: [r] + character[a-z/0-9/special character]

7. Cut, Copy, and Paste:
Cut Line: In command mode, press
ddto cut the current line.Before:

After:[dd]

Copy Line: In command mode, press
yyto copy the current line.
Paste Line: Move to the desired location and press
pto paste below the cursor orPto paste above the cursor.Paste[↓] ---> p
Before:
After:

Paste[↑] ---> P
Before:

After:

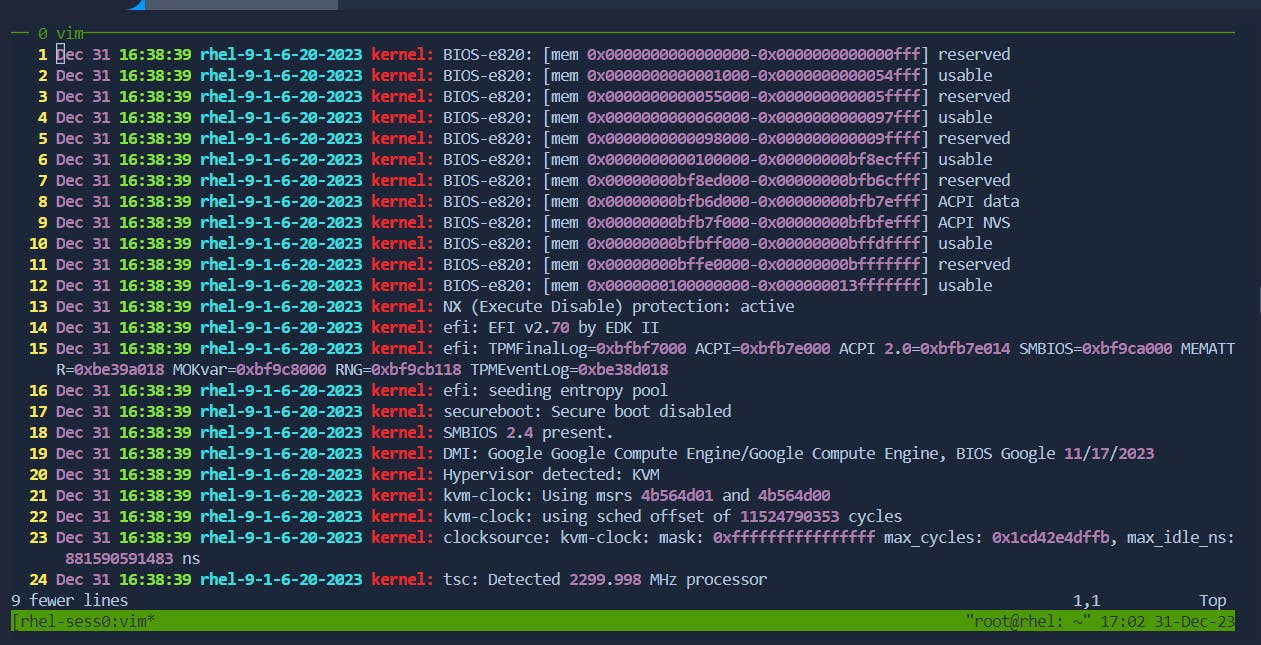
8.Cut and Paste a Range of Lines:
Cut Lines: In command mode, use
:m,n dto cut lines frommton.Cuting lines from 1-9
Before:
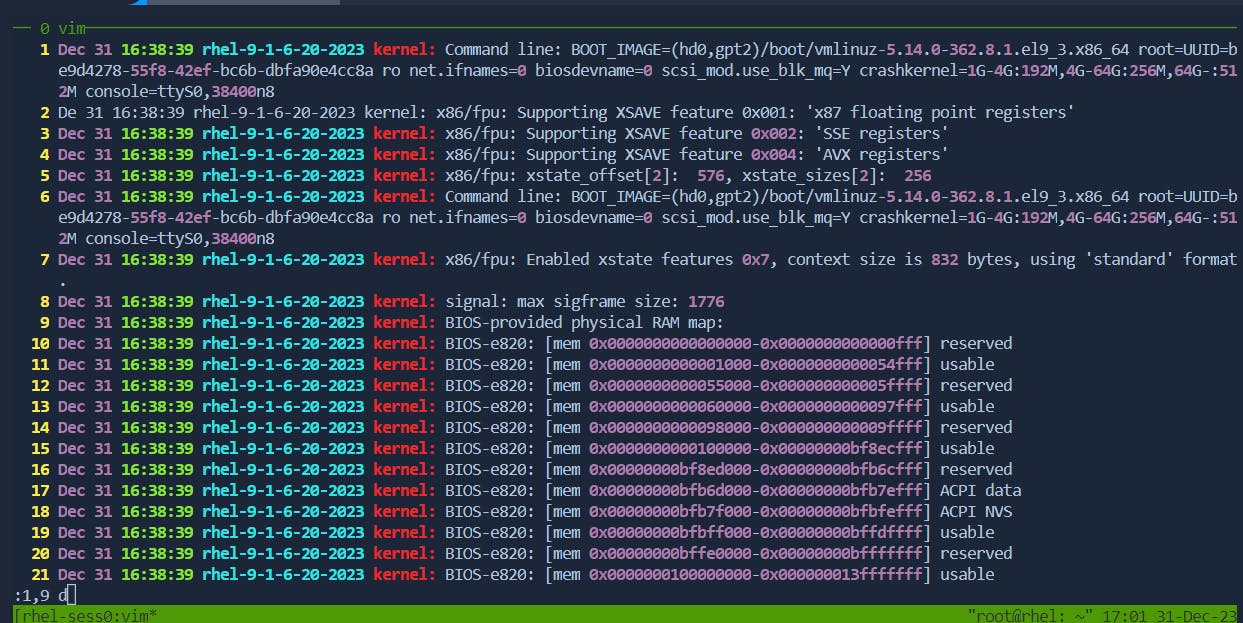
After:
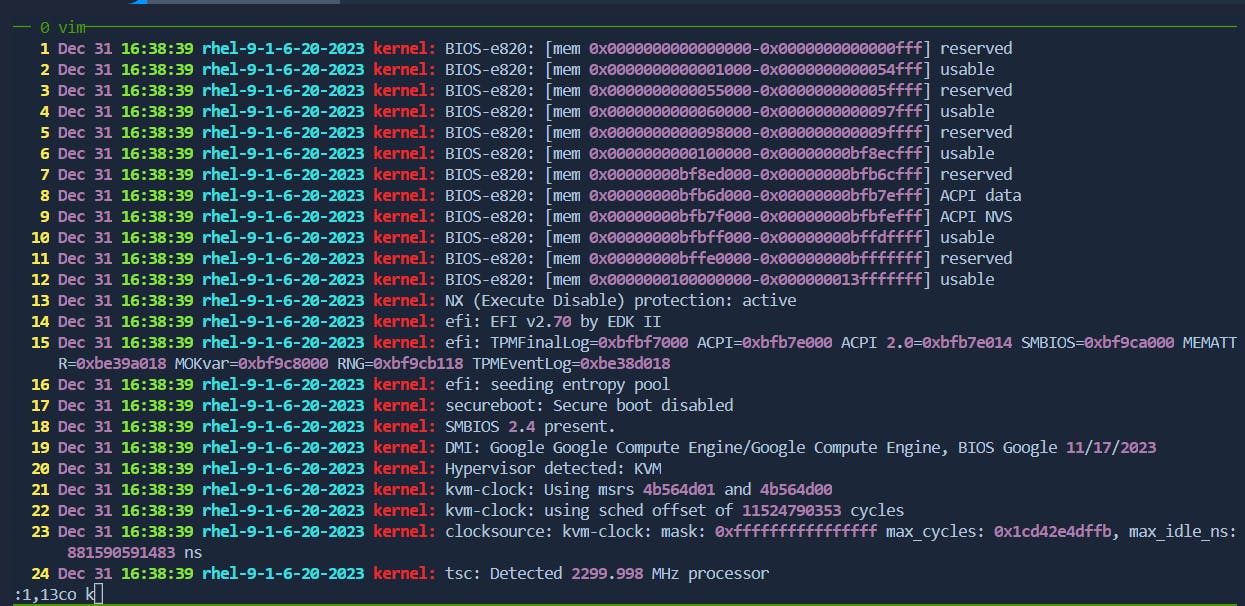
Copy Lines: In command mode, use :m,n co k to copy lines from m to n.
copying lines 1-13
9.Line Manipulation:
Join Two Lines: In command mode, with the cursor on the first line, press
J.Before:

After: [J]

Duplicate Line: In command mode, with the cursor on the line, press
yyp.Before:

After:

10. Navigation and Word Movement:
Jump to Start of Current Line: Press
0(zero).Before:
  This is some text.
  |Cursor is here.
After:
  |This is some text.
  Cursor is here.
Press
0(zero) to move the cursor to the start of the current line.Delete Before Cursor: Press
Xto delete the character before the cursor.Before:
  This is some text.
  |Cursor is here.
After:
  This is some text.
  | is here.
Press
Xto delete the character before the cursor.Delete After Cursor: Press
xto delete the character after the cursor.Before:
  This is some text.
  |Cursor is here.
After:
  This is some text.
  Cursor s here.
Press
xto delete the character after the cursor.Jump Word by Word: Press
wto move forward andbto move backward.Before:
  This is some text.
  |Cursor is here.
After:
  This is some text.
  Cursor| is here.
Press
wto move forward by one word.
11.Search:
Search Forward: Press
/followed by the search term and pressEnter.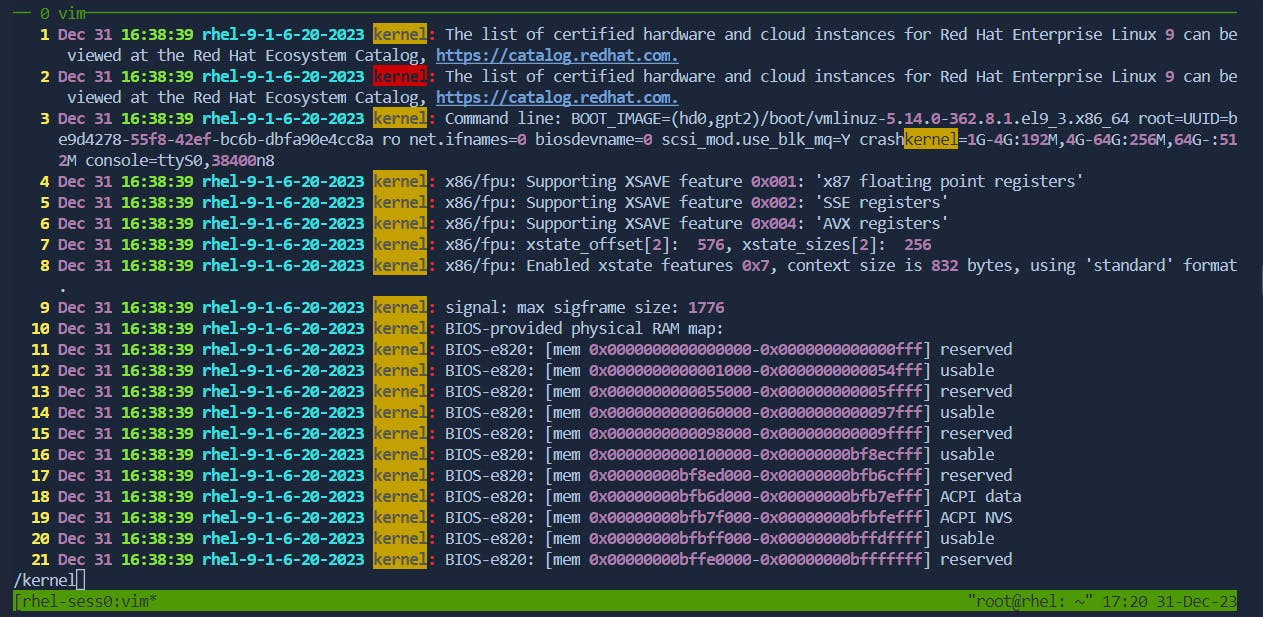
Search Backward: Press
?followed by the search term and pressEnter.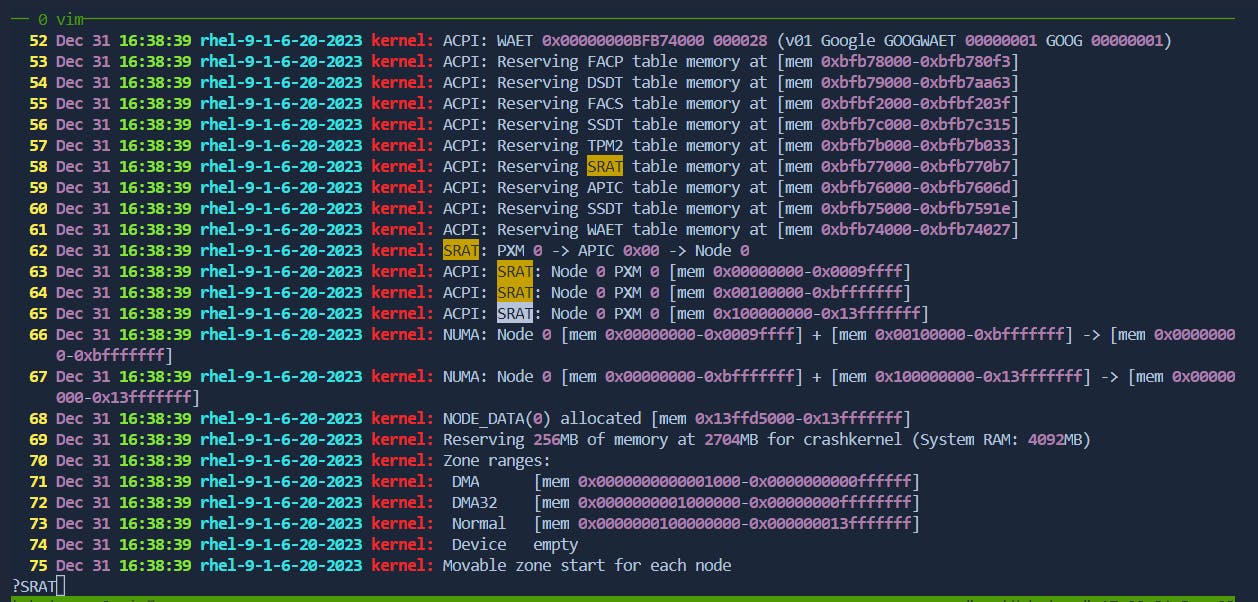
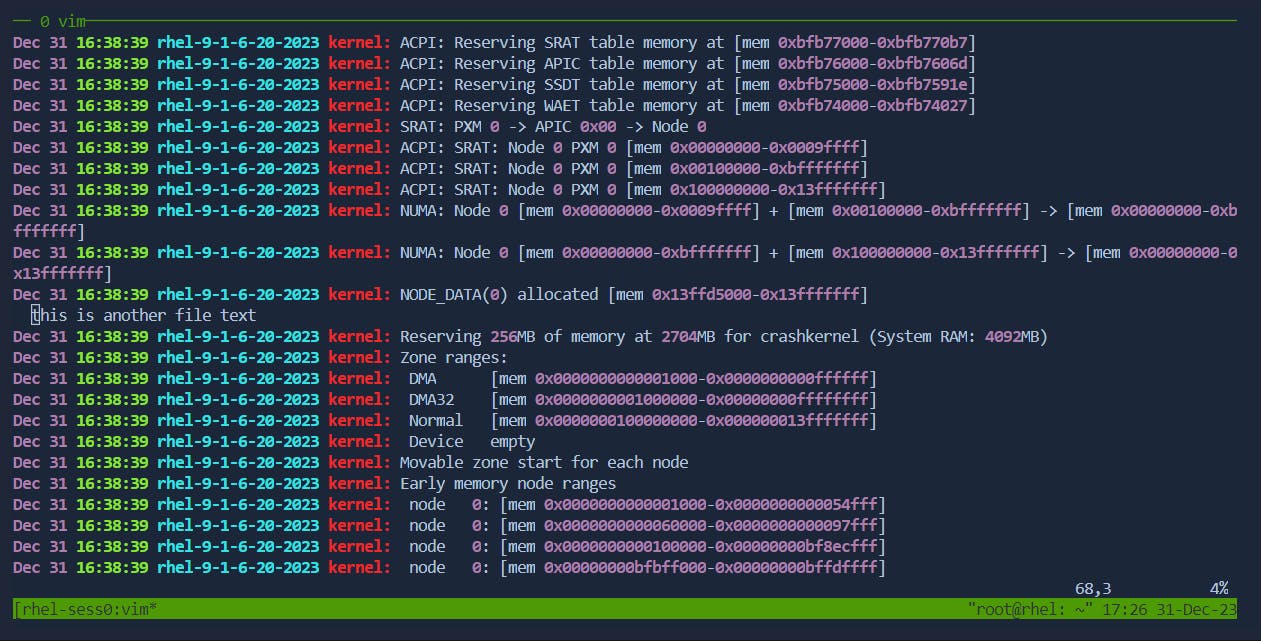
12.Paste from Other Files:
Paste External Content: In command mode, use
:r filenameto paste the content offilenamebelow the cursor.Before:
After:
13.Working with Text Buffers:
Copy to Buffer: In command mode,
"<register>yto copy to a register.Before:
  This is some text.
  |Cursor is here.
Command:
"ayyThis copies the entire line to register
a.After:
  This is some text.
  |Cursor is here.
The line is now copied to register
a.
Paste from Buffer: In command mode,
"<register>pto paste from a register.Before:
  This is some text.
  Cursor is here.
Command:
"apThis pastes the content of register
abelow the cursor.After:
  This is some text.
  Copied line is pasted here.|Cursor is here.
The content of register
a(the copied line) is pasted below the cursor.
Editing Multiple Files:
Edit Multiple Files: In command mode, use
:args file1 file2to edit multiple files.Command:
:args file1 file2This command loads
file1andfile2into Vim's argument list, allowing you to navigate and edit them.Next File: Use
:nto move to the next file.Next File:
Before:
Editing file1. |Cursor is here.Command:
:nThis moves to the next file in the argument list.
After:
Editing file2. |Cursor is here.The cursor is now in the next file (
file2).
Rewind to First File: Use
:rewto go back to the first file.Before:
Editing file2. |Cursor is here.Command:
:rewThis returns to the first file in the argument list.
After:
Editing file1. |Cursor is here.The cursor is back in the first file (
file1).
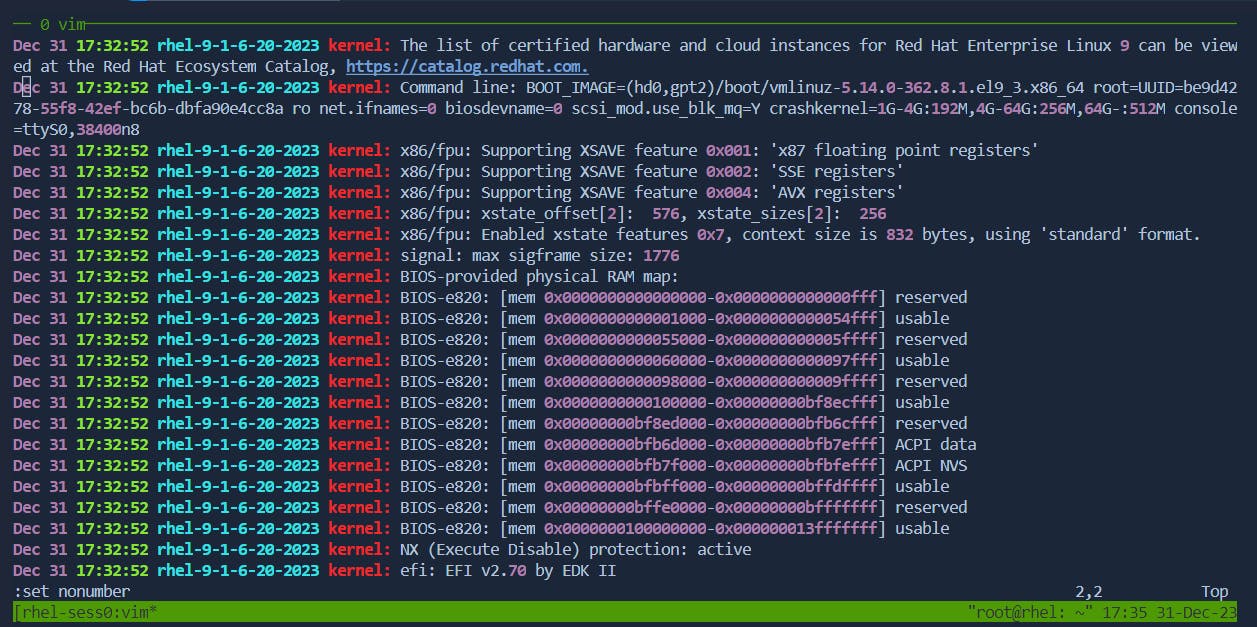
Enable/Disable Line Numbers:
Enable Line Numbers: In command mode, use
:set number.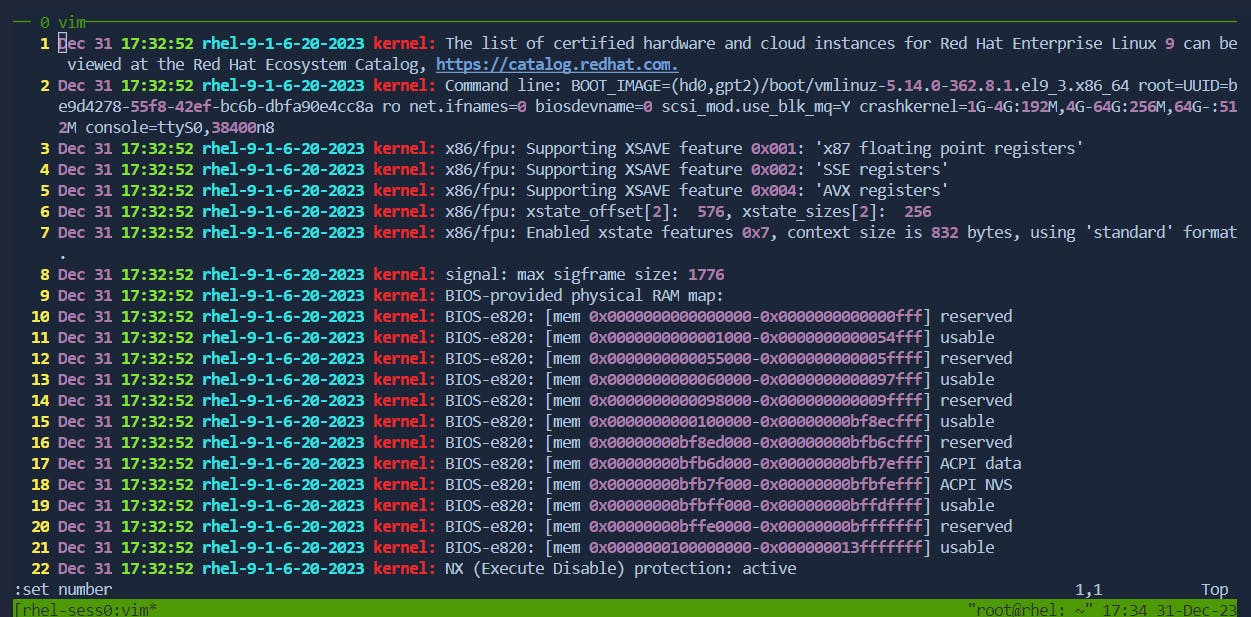
Disable Line Numbers: In command mode, use
:set nonumber.