


Basic Commands
whoami:
This command simply displays the username of the user currently logged in. It's a quick way to verify your identity in the terminal.
Example:
$ whoami
who:
This command lists all users currently logged into the system, along with their terminal name, login time, and idle time.
Example:
$ who
w:
Similar to
who, thewcommand provides a more detailed view of logged-in users. It includes information like the process ID (PID), CPU usage, and memory usage.
Example:
$ w
- id: This command displays information about the current user, including their user ID (UID), group ID (GID), group names, and some shell settings.
Example:
$ id
Understanding su - and su:
Both su and su - allow you to switch user accounts on a Linux system, but with key differences:
- su: This is the basic form of the command. If you use
suwithout any arguments, it prompts you for a password and switches you to the root user account by default. However, it inherits the environment variables and working directory of your current user.
Example:
$ su
Password: (enter root password)
# (now you're the root user)
- su - (or su --login): This variation provides a more complete user switch. It launches a new login shell for the target user, complete with their default environment variables, shell settings, and home directory.
Example:
$ su - username
Password: (enter target user's password)
$ (now you're logged in as the specified user)
Choosing Between su and su -:
Use
suwhen you need to execute a single command or a small set of commands with root privileges.Use
su -when you want to perform extended tasks as another user and benefit from their specific environment.
VIsudo / sudoers:
Sudo (Superuser Do) is a powerful tool in Linux that allows authorized users to execute commands with the privileges of another user, typically the superuser. The configuration file that governs sudo permissions is known as the sudoers file, often edited using the visudo command. In this blog post, we'll delve into configuring sudoers to allow or block specific commands and achieve passwordless execution for added convenience.
Understanding sudoers and visudo: The sudoers file, usually located at
/etc/sudoers, defines who can run what commands as which user and under what circumstances. It's crucial to edit this file withvisudoto ensure syntax integrity and avoid locking yourself out due to errors.sudo visudoAllowing Specific Commands: To grant a user or group permission to execute specific commands, add entries in the sudoers file. For example, to allow a user named "john" to restart the Apache web server without a password prompt:
john ALL=(ALL) NOPASSWD: /usr/sbin/service apache2 restartThis line breaks down as follows:
john: The user granted permissions.ALL: Allows the user to run the command from any host.NOPASSWD:: Specifies that no password is required./usr/sbin/service apache2 restart: The specific command allowed.
Blocking Specific Commands:
To deny access to specific commands, use the
!symbol. For example, to deny the user "bob" from accessing thefdiskcommand:bob ALL=(ALL) !/sbin/fdiskPasswordless Execution for Specific Commands: Enabling passwordless execution is useful for certain trusted commands. To allow the user "alice" to run any command without entering a password:
alice ALL=(ALL) NOPASSWD: ALLHost Aliases: You can define host aliases to simplify the sudoers file and make it more readable. For example:
Host_Alias WEBSERVERS = webserver1, webserver2Then, you can use this alias in rules:
%admins WEBSERVERS=(ALL) NOPASSWD: /etc/init.d/apache2User and Runas Aliases: Similar to host aliases, you can create user aliases and runas aliases to enhance readability:
 User_Alias SYSADMINS = john, jane
 Runas_Alias DB = postgres
And use them in rules:
SYSADMINS ALL=(DB) /usr/bin/psqlCommand Aliases: Define command aliases to simplify and centralize complex command sets:
Cmnd_Alias NETWORKING = /sbin/route, /sbin/ifconfig, /bin/pingThen, incorporate the alias in a rule:
%netadmins ALL=(ALL) NETWORKINGDefaults Directive: The
Defaultsdirective allows you to set global options for sudo. For instance:Defaults requirettyThis requires a tty for users running commands with sudo.
Logging: Enable detailed logging to keep track of sudo usage. Add the following to the sudoers file:
Defaults logfile=/var/log/sudo.logThis logs sudo activity to
/var/log/sudo.log.Command Tagging: Tagging allows you to categorize commands for more fine-grained control. For instance:
Cmnd_Alias SHUTDOWN = /sbin/poweroff, /sbin/rebootAnd in a rule:
%operators ALL=(ALL) NOPASSWD: SHUTDOWN, !/usr/bin/pkillThis allows operators to execute shutdown commands but not the
pkillcommand.Time-Based Restrictions: Apply time restrictions to limit when users can execute specific commands. For example:
john ALL=(ALL) /bin/ls, !/bin/rm, !/bin/mv, !/bin/cp, !/bin/nano, !/bin/vi, !/bin/cat, !/bin/touch, !/bin/echo, !/bin/ed, !/bin/gedit, !/bin/gnome-terminal, !/bin/suThis denies John the ability to perform potentially destructive commands during office hours.
Conditional Statements: Use conditional statements for more complex rule structures. For instance:
# Allow users in the 'admin' group to run any command on 'webserver1'
%admin webserver1=(ALL) ALL

# Allow users in the 'admin' group to run only '/bin/ls' on 'webserver2'
%admin webserver2=(ALL) /bin/ls
Passwd and Shadows:
The /etc/passwd file is a critical component of user management in Red Hat Enterprise Linux (RHEL). It contains essential information about user accounts, facilitating user authentication and system access. In this blog post, we'll explore the structure of the /etc/passwd file, deciphering the fields that store user details such as username, encrypted password, user ID (UID), group ID (GID), comment, home directory, and login shell.
Introduction to /etc/passwd:
The
/etc/passwdfile is a plaintext database that stores user account information. Each line in the file corresponds to a user, and fields are delimited by colons (:).Fields in /etc/passwd:
Let's break down the fields in a typical
/etc/passwdentry:username:encryptedpassword:userid:groupid:comment:homedirectory:loginshellusername: The user's login name.encryptedpassword: The hashed or encrypted form of the user's password. (Note: Actual passwords are stored in the/etc/shadowfile for security reasons.)userid (UID): A unique numerical identifier assigned to the user.groupid (GID): The primary group identifier for the user. If we create a user by adding gid 'o' system treats as rootrhel 7/8 : 0-999 ---> reserved uid for service accounts/systemid
rhel6 : 0-499 ---> reserved uid
comment: A field for additional information about the user, often the user's full name or a description.homedirectory: The absolute path to the user's home directory.loginshell: The default shell or program that is run when the user logs in.for service account it will be
nologin
Example Entry in /etc/passwd: Let's examine a sample entry in
/etc/passwd:john:x:1001:1001:John Doe:/home/john:/bin/bashusername: johnencryptedpassword: x (actual password stored in/etc/shadow)userid (UID): 1001groupid (GID): 1001comment: John Doehomedirectory: /home/johnloginshell: /bin/bash
Understanding the /etc/shadow file:
The
/etc/shadowfile complements/etc/passwdby storing encrypted password information, enhancing security by restricting access to sensitive data. It contains lines with multiple fields:username:encrypted_password:last_password_change:min_days:max_days:warn_days:inactive_days:expiration_date:reservedusername: The name of the user.
encrypted_password: The hashed and encrypted password.
last_password_change: The date of the last password change, typically expressed as the number of days since January 1, 1970.
min_days: The minimum number of days required between password changes.
max_days: The maximum number of days the password is valid.
warn_days: The number of days before password expiration to display a warning.
inactive_days: The number of days a user account can remain inactive before being disabled.
expiration_date: The date when the account will be disabled, expressed similarly to
last_password_change.reserved: Reserved for future use.
Example entry:
john:$6$trp9LbOm$loA9egbQ7F5EAg5bsOjDVQoY3SD4YZOTbOoyl.PDh4wzLWUfV1wKp5HYctW0ZINRxSG
Accessing and Editing /etc/passwd: It's essential to exercise caution when editing the
/etc/passwdfile manually. Thevipwcommand provides a safe way to edit both/etc/passwdand/etc/shadowfiles:sudo vipw
Useradd
The useradd command is used to add a new user to the system. Its basic syntax is:
sudo useradd [options] username
Options:
-m (--create-home): This option ensures the creation of the user's home directory. If not specified, the home directory is not created.
sudo useradd -m john-d (--home): Use this option to specify the home directory for the new user. By default, it is created in the
/homedirectory.sudo useradd -m -d /home/custom_home jane-c (--comment): The comment option allows you to add a description or additional information about the user.
sudo useradd -m -c "John Doe, Developer" john-s (--shell): Specify the login shell for the user. This sets the default shell the user will use upon login.
sudo useradd -m -s /bin/bash jim-g (--gid):
The
-goption is used to specify the initial login group for the new user.If not specified, the default behavior is to create a group with the same name as the user and make it the user's initial login group.
It accepts either a group name or a numeric group ID.
Example:
sudo useradd -m -g developers johnThis command creates a new user named "john" and assigns the "developers" group as the initial login group.
sudo useradd -m -g 1001 janeIn this example, the user "jane" is created with the initial login group specified by its group ID (1001).
-u (--uid):
The
-uoption is used to set the user ID (UID) for the new user.It accepts either a numeric UID or a name.
The UID must be unique, and by default, Linux assigns the next available UID starting from 1000.
Example:
sudo useradd -m -u 2000 bobThis command creates a new user named "bob" with a specific UID of 2000.
sudo useradd -m -u alice alice
The /etc/default/useradd file contains default values for user creation. Administrators can configure this file to set system-wide defaults for user accounts.
Example /etc/default/useradd content:
  GROUP=100
  HOME=/home
  INACTIVE=-1
  EXPIRE=
  SHELL=/bin/bash
  SKEL=/etc/skel
  CREATE_MAIL_SPOOL=yes
GROUP: The numerical group identifier for the default group assigned to new users.
[-g]HOME: The default parent directory of the home directory for new users.
[-d]INACTIVE: The number of days after a password expires until the account is permanently disabled.
[-f]EXPIRE: The expiration date for the user account in the format YYYY-MM-DD.
[-e]SHELL: The default login shell for new users.
[-s]SKEL: The directory containing files and directories to be copied to the user's home directory.
[-k]
CREATE_MAIL_SPOOL: If set to "yes," a mail spool file will be created for new users.
Userdel
userdelis a command in Unix/Linux operating systems used to delete user accounts.
Example:
userdel username
This command removes the specified user account (username in this case) from the system.
- The
-roption removes the user's home directory along with the user account.
Example:
userdel -r username
This command not only deletes the user account (username) but also removes the associated home directory and mail spool.
Usermod
usermod is used to modify user account properties.
-coption: Changes the user's comment or GECOS field.usermod -c "John Doe" usernameThis sets the comment for the user
usernameto "John Doe."-soption: Changes the user's login shell.usermod -s /bin/bash usernameThis changes the login shell for the user
usernameto/bin/bash.-Goption: Adds the user to additional supplementary groups.usermod -G group1,group2 usernameThis adds the user
usernameto supplementary groupsgroup1andgroup2.
Note:- we can directly modify the options in /etc/passwd. while editing we need to be cautious
How to Add Multiple users with script
#!/bin/bash

# Define user details
user_list=(
    "user1:1001:1001:User One:/home/user1:/bin/bash"
    "user2:1002:1002:User Two:/home/user2:/bin/bash"
    "user3:1003:1003:User Three:/home/user3:/bin/bash"
)

# Loop through the user list
for user_info in "${user_list[@]}"; do
    IFS=":" read -r username uid gid comment homedir shell <<< "$user_info"

    # Check if the user already exists
    if id "$username" &>/dev/null; then
        echo "User $username already exists. Skipping..."
    else
        # Create the user with specified details
        useradd -m -u "$uid" -g "$gid" -c "$comment" -d "$homedir" -s "$shell" "$username"
        echo "User $username created successfully."
    fi
done

echo "User creation script completed."
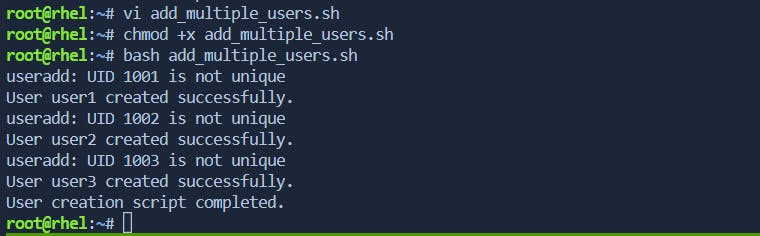
[ Note:- UID is not unique means that we have specified uid is already exists / defined to another user]
Explanation:
This line indicates that the script should be executed using the Bash shell.
#!/bin/bash
An array named user_list is declared, containing details for each user in the format "username:uid:gid:comment:homedir:shell".
# Define user details
user_list=(
    "user1:1001:1001:User One:/home/user1:/bin/bash"
    "user2:1002:1002:User Two:/home/user2:/bin/bash"
    "user3:1003:1003:User Three:/home/user3:/bin/bash"
)
The script then enters a loop, iterating over each element (
user_info) in theuser_list.IFS(Internal Field Separator) is temporarily set to ":" to extract values from each line inuser_list.readis used to split the line into separate variables (username,uid,gid,comment,homedir,shell).
# Loop through the user list
for user_info in "${user_list[@]}"; do
    IFS=":" read -r username uid gid comment homedir shell <<< "$user_info"
The script checks if the user already exists using the id command. The &>/dev/null part redirects both standard output and standard error to /dev/null to suppress any output.
 # Check if the user already exists
    if id "$username" &>/dev/null; then
        echo "User $username already exists. Skipping..."
    else
If the user doesn't exist, the script uses the
useraddcommand to create the user with the specified details (-m: create home directory,-u: set UID,-g: set GID,-c: set comment,-d: set home directory,-s: set login shell).An informational message is printed indicating that the user has been created successfully.
 # Create the user with specified details
        useradd -m -u "$uid" -g "$gid" -c "$comment" -d "$homedir" -s "$shell" "$username"
        echo "User $username created successfully."
    fi
done
Finally, the script prints a message indicating that the user creation script has completed.
echo "User creation script completed."
To run the script, save it to a file (e.g., create_users.sh), make it executable (chmod +x create_users.sh), and execute it (./create_users.sh). Customize the user_list array as needed for your specific user creation requirements.